Graysville Campaign 1863
Introduction
The Graysville Campaign is a small fictional encounter set in 1863 between a Union division and an understrength Confederate division.
I will be using Warlord Games' Epic ACW figures to play out the battles and a home brew hex and counter map to run the campaign.
The mechanics have been inspired by the campaign chapter in Charles Grant's excellent book, Programmed Wargame Scenarios (For Solo and Multi Player Games). I shall be using my own rules 'Two Flags - One Nation' to manage any encounters on the table.
Intitially this page starts with the construction of the campaign and then follows the course of events as an ongoing AAR, with the latest post being at the bottom of the page to keep the narrative in chronological order.
Building the map
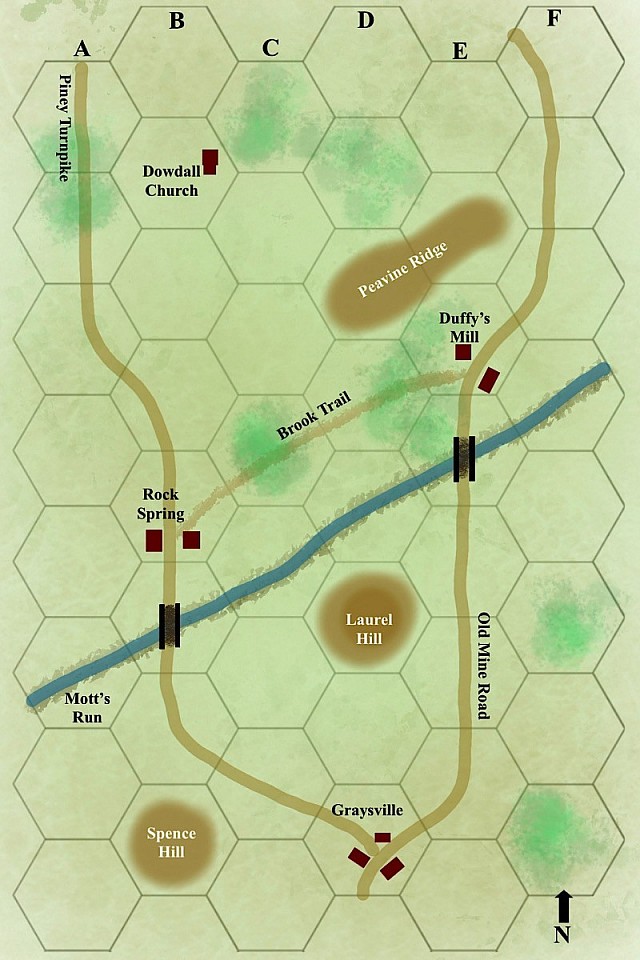
I see this mini campaign as being something like a three day running battle. There are three turns per day, just using day light hours and infantry units can move 1 hex per turn.
Charles Grant's Programmed Wargame Scenarios book, has inspired the campaign framework, though I am using my own map, order-of-battle and order / response aspects.
As a fictional battle, the map has some made up names, plus a few borrowed from various ACW boardgame maps that I own, so it is a typical rather than actual representation.
The programmed part of the scenario means that some deployments, orders and responses to enemy moves have been built into the campaign and these will be acted upon in a random way, by dice roll.
As an example, at the start of play a dice is rolled to determine the battle plan that the attacker will use, describing where the emphasis of attack will be and allocating forces accordingly.
By also randomising to a degree the defenders 'deployments' and 'responses', the campaign should start to get a character of its own and feel fresh to my eyes despite all of my personal involvement with managing it.
Work has started on two Orders-of-Battle, with the campaign being based around a division per side and the attacker having a 3:2 benefit in numbers. The defender will be dispersed around the map, so the immediate effect will be greater than 3:2 as the attackers meet various outposts and blocking forces etc.
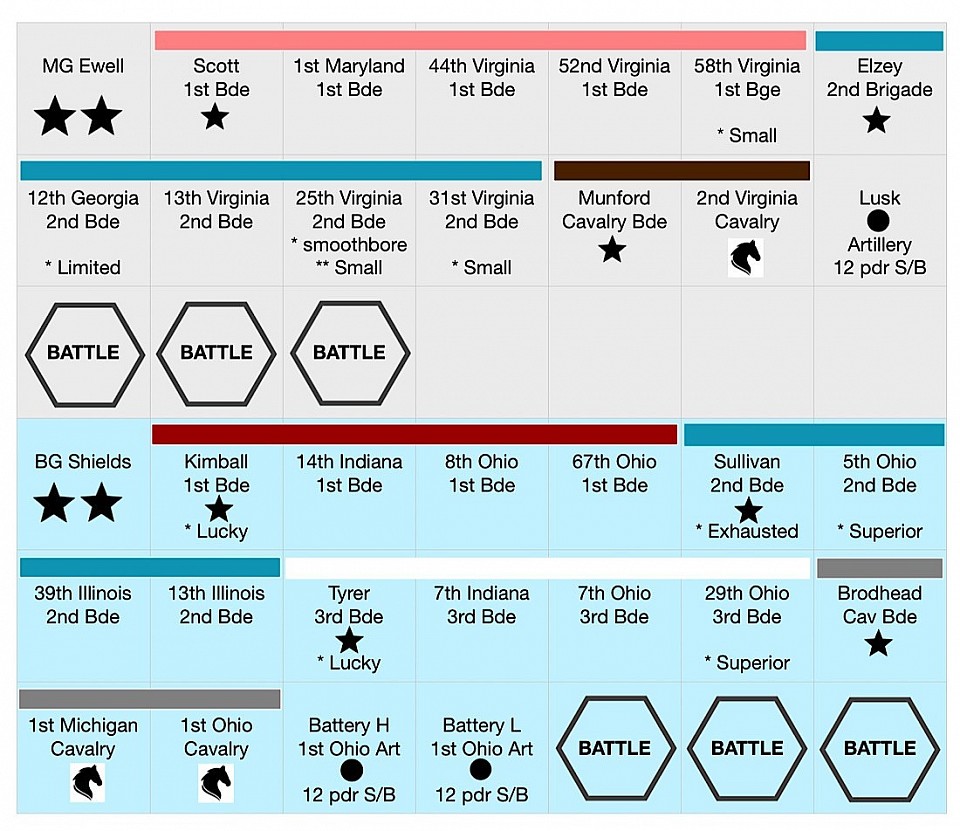
Game Counters
The Shenandoah Valley 1862 campaign text has been dipped into to get an Order-of-Battle, though I am setting the Graysville campaign in 1863, not that it matters much except, using my own rules, units roll pre-battle (or pre-campaign in this case) on the Arming Table to see whether they get smoothbore or rifled muskets, so they will be using the 1863 column with rifling much more common.
Against the odds! Only one unit gets armed with smoothbore musket, Elzey's 25th Virginia (Confederate).
Next, the brigade commander attributes were rolled for. The Confederate commanders didn't get any, so they remain standard commanders, but for the Union, the dice went a little crazy.
Kimball gets the Lucky attribute (so some re-rolls for him) as does 3rd Brigade's Tyrer. Colonel Sullivan was less fortunate and he rolled 'Exhausted'. This will bring him some command and control problems, so perhaps Shields might prefer not to give his brigade a leading role.
Some units needed to be described as 'small'. This is because Grant's programmed scenario book, makes use of smaller detatchments and refers to 5% of the force being given various responsibilities - usually outpost type positions and small units seems to be the best way to handle this sort of thing - we shall see!
I have knocked up myself a counter sheet to use with the map. It turns out I forgot to add another confederate cavalry unit (6th Virginia) so a separate counter has been made for that.
Some 'Battle' counters have been included. These are used to mark those enemy occupied hexes that a friendly unit / stack moves into, which will each needed to be 'battled out' on the figures table for that turn. This is done as soon as an enemy hex is entered, units that then enter the hex later in that same campaign turn, sit on top of the battle marker and will arrive on the tabletop battle later as a reinforcement.
And so it begins
And, so it begins!
It is Morning, 18th June 1863. Confederate, Major General Ewell has been ordered to the town of Graysville, which sits on a strategically important part of the road net. There he holds 1st Brigade under Colonel Scott in reserve, while his 2nd Brigade (Brigadier General Elzey) is dispersed further forward and has been deployed beyond Mott’s Run to cover the two approach roads and associated bridges. 1st Cavalry Brigade is deployed to cover the small ridge that overlooks Old Mine Road,
A Union division under Brigadier General Shields in approaching. His orders are to secure Graysville with all haste.
Having taken the inspiration for this campaign from Charles Grant’s book ‘Programmed Wargame Scenarios’, Orders have been given to the units of both sides, but equally importantly, each location occupied by a Confederate force has been given some dice driven options that they will test against in response to any hostile action.
What this means is that, for example, as Dowdall Church is attacked, the occupying 31st Virginia regiment located there will dice against a number of pre-determined potential response. So until that happens, we will not know how 31st will respond. Mostly the responses are weighted towards a certain decision, but who knows what the dice will give us.
Likewise, I have set up some variables for the Union attack. At the start of play, a D6 will determine how Shields will deploy and direct his division. So the first thing we must do is to determine that. Let’s work out Shield’s initial plan now!
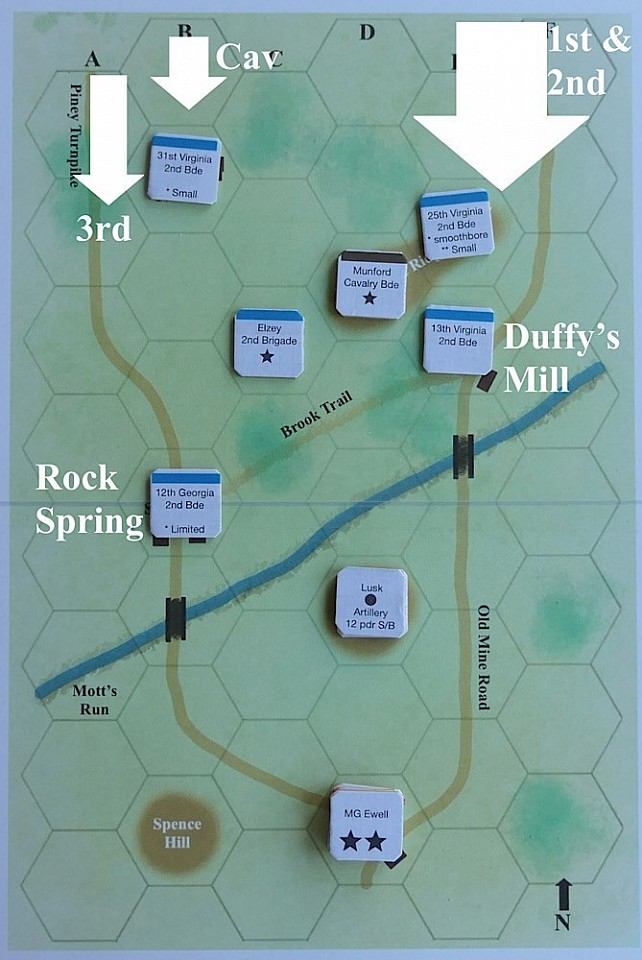
Roll a D6 …… 2, that result says;
1st & 2nd Brigade, plus Battery H push down the Old Mine Road. 1st Brigade will clear Peavine Ridge and 2nd Brigade with the artillery will push on along the road to seize Duffy’s Mill (Remember 2nd Brigade commander - Colonel Sullivan, is suffering from exhaustion).
3rd Brigade will advance directly down Piney Turnpike to capture Rock Spring, while Colonel Brodhead will take his two cavalry regiments to secure Dowdall Church.
These manoeuvres are a pre-cursor to the union taking the bridges across Mott’s Run and advancing onto Graysville.
Next, we shall see the Union advance onto the map and see how the forward Confederate elements respond to the ‘sea of blue’! No doubt a relay of messages and orders will quickly follow.
Opening Action
Brodhead's two cavalry regiments (1st Ohio and 1st Michigan) move onto Dowdall Church, which is defended by 31st Virginia (classed as a small regiment).
The cavalrymen dismount and move within carbine range, taking a volley of fire for their troubles.
Their return fire is rather effective and 31st are quite discomforted by their casualties.
[Checking on the 31st's responses and rolling a D6, it is determined that the Virginians will stand and fight until they take their first casualties and then withdraw, intending to fall back on Rocky Spring].
Accordingly, after taking losses, the 31st successfully disengage, though pursued by the cavalrymen who remain on foot.
The Union have gained their first objective (1 VP) which in truth has been no more than a skirmish.
The 31st Virginia scouts have managed to properly identify that their wing is facing an infantry brigade, with cavalry and gun support. They send messengers to Elzey to that effect.
However, over on the right, 25th Virginia on the ridge can only see a single Union infantry brigade. They have yet to see the other infantry brigade with its artillery and so their messengers to Elzey only advise of the nearest infantry brigade.
At Elzey's headquarters, the arrival of those messages suggest that the union main effort is going to be on the Confederate left, down Piney Turnpike - are the Confederates about to be wrong-footed!
Early afternoon - Thursday 18th June 1863
Elzey dispatches fast riders to Ewell at Graysville, via Rocky Spring Bridge, advising that the Union are advancing down both roads, with the main effort seemingly being on the Piney Turnpike.
He also dashes off a quick message to Colonel Munford (1st Cavalry Brigade), who is over on Peavine Ridge, asking for support at Piney Turnpike, to deal with the enemy cavalry.
Munford however has an emerging problem on his own doorstep. The Union 1st Infantry Brigade has just started their assault on the eastern end of Peavine Ridge, the part of the high ground defended by 25th Virginia Infantry Regiment. Munford’s own position is now increasingly linked to whatever unfolds further down the ridge.
At Dowdall Church, 1st Ohio Cavalry has requested permission from Brodhead to pursue the retreating 31st Virginia Infantry, but Brodhead refuses [failed initiative die!] preferring to await further instruction from Shields.
[As it happens, orders are already on the way from Shields, directing Brodhead that his cavalry should bypass Rock Spring and secure Rock Spring Bridge].
Kimball (Union - 1st Infantry Brigade) takes 14th Indiana, 8th Ohio and 67th Ohio into action against 25th Virginia on Peavine Ridge. Known as ‘Lucky Kimball’ he held his line back and opened fire at long range, with decent results [thanks to a Kimball 'lucky' re-roll]. The 25th, being smoothbore armed are too far away at this point to offer effective return fire.
[in any case, a test on the Response Table requires 25th Virginia to immediately abandon their position and retire to Duffy’s Mill].
25th Virginia are easily able to disengage, limping away [with 2 hits], disappearing from Union view as they descend the rear slopes of the ridge.
They are surprised to see 13th Virginia advancing towards them. They had been positioned at the mill, but have marched to the sound of guns [following a Response Test].
With three Union regiments on their tail, both 13th and 25th fall back on Duffy’s Mill and set about creating some barricades.
Late Evening, Thursday 18th June 1863
Orders and messages are criss-crossing the district. Brodhead’s Union cavalry receive Shields orders to move and bypass Rock Spring and capture the bridge.
News has reached Ewell’s headquarters at Graysville that the enemy main thrust is coming down Piney Turnpike. He is with Scott and orders him to march with 1st Infantry Brigade and respond to the threat against the two bridges, with two infantry regiments to be sent to Rock Spring Bridge and one regiment to move up to the Old Mine Road bridge and that both bridge positions should be held for as long as possible.
In addition, Scott orders his artillery (Lusk), presently on Laurel Hill, to move upstream and support the infantry at Rock Spring Bridge. Ewell moves his headquarters further forward to Laurel Hill.
25th Virginia are now seeing a second Infantry Brigade together with their artillery, appear on Old Mine Road and immediately alert Elzey about these additional troops advancing towards Duffy’s Mill. Elzey, realises the extent of the danger emerging on his right and gets word off to Ewell urgently.
The Fighting.
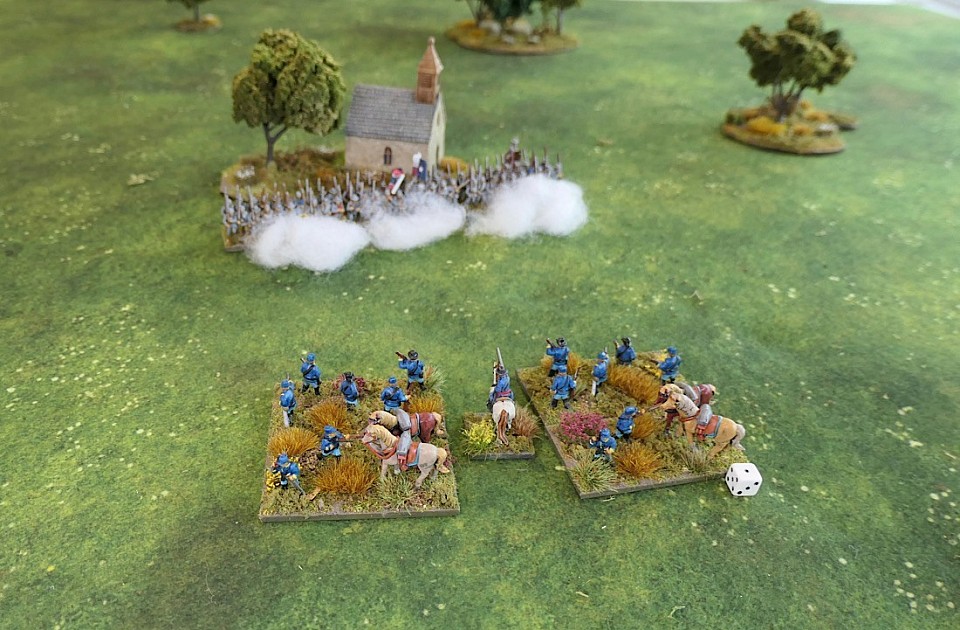
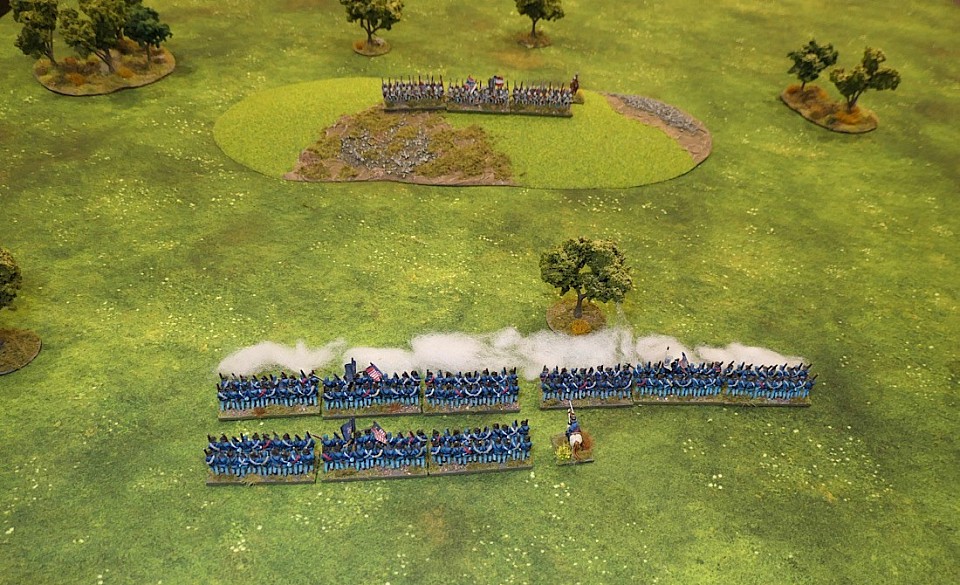
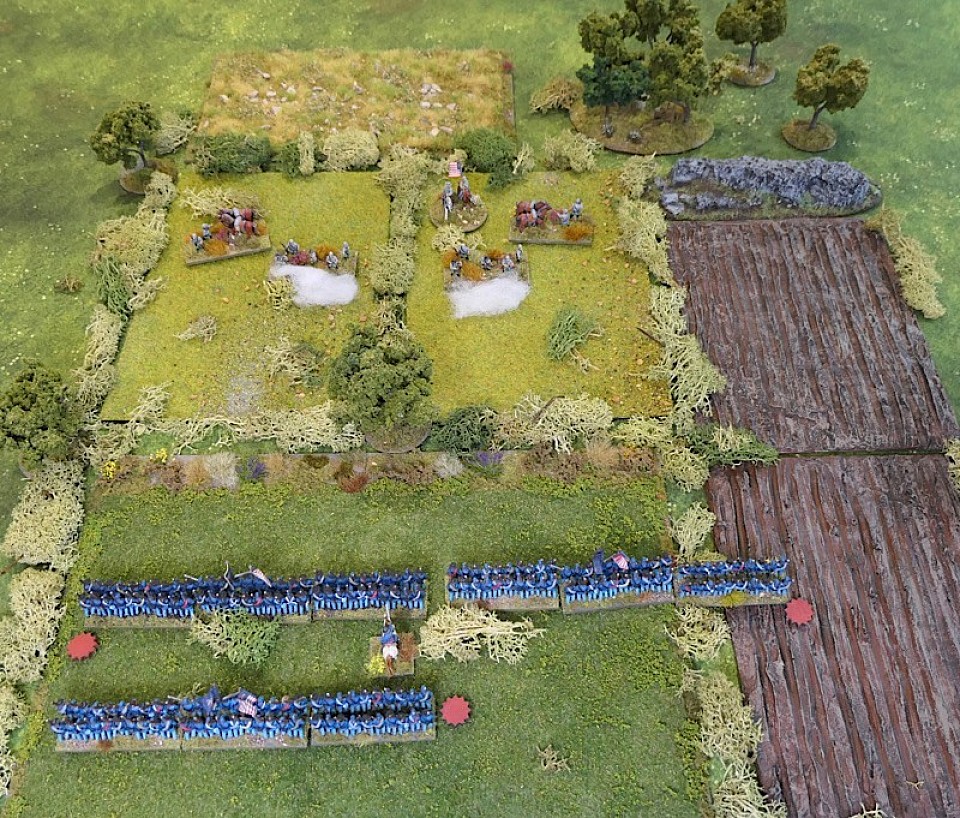
Having earlier cleared 25th Virginia from the eastern end of Peavine Ridge, Kimball presses on to clear the rest of the feature, held by Mumfords cavalry brigade of two regiments, which has taken up skirmishing positions amongst the difficult terrain (see photo above).
Kimball decides that his men will rush at the cavalrymen to get amongst them as quickly as possible, but as he approaches, they mount up and fall back some distance. Confident that the cavalry are not committed to defending the ground, he again rushes forward, his lines becoming increasingly disordered in the difficult terrain.
Munford is vexed at what to do for the best, he can easily have the brigade mount up and pull out, keeping his force relatively unscathed, but he does not want to abandon the hill so readily. In the end through a combination of bravery and stubbornness, the cavalry stand their ground and deliver rapid fire …. will they be swept away by the union charge?
Munford’s volleys do a lot of damage and the Union line hesitates and then quickly retires - beaten off, for now. Kimball’s attack has failed.
[When I say Munford was vexed, it was of course I who was torn between standing and retreating. Had the Union got amongst the cavalrymen, Munford’s men would have suffered greatly, so really standing firm was something of a gamble, but they did it and it paid off]
The Union’s 14th Indiana and 67th Ohio have sustained heavy casualties. With the offensive capability of both regiments curtailed - will Kimball renew the attack? Regardless, with Kimball now tied up with Munford, the cavalrymen’s actions have likely saved the Confederate soldiers at Duffy’s Mill, from having to face off against two fresh Union infantry brigades.
[Munford’s brigade had not taken enough losses for their programmed retreat orders to kick in, so the cavalry stood their ground and waited!]
Night - Thursday 18th into Friday 19th.
Confederate - Ewell conferred with Scott at Laurel Hill. They are still convinced that the main line of Union attack is coming down Piney Turnpike and the feeling is that they have done all they can to meet that threat. Ewell is concerned by his lack of artillery and favours their retention on Laurel Hill as a reserve and so questions Scott's decision to send the guns to Rock Creek bridge. Scott stresses the need to bring maximum force against the Union attack and to at least match the Union guns. Shields concedes the point [a die roll].
Meanwhile ... it is clear to Elzey, on the north side of Mott's Run, that tomorrows fighting will see the action at Duffy's Mill as being pivotal to the days events .... "where the hell is Scott"!
Union - Kimball appraises Shields of his setback at Peavine Ridge and asks that Brodhead's cavalry support him in another attack on Munford's cavalry. Shields is not happy at the delays and losses at the ridge and that Kimball is not now joining Sullivan's 2nd Brigade for the assault on Duffy's Mill, but he allows himself to be pursuaded that the current cavalry mission to bypass Rock Spring and capture the bridge is probably too ambitious and he agrees that Brodhead should support Kimball at the ridge ..... but he wants results!
Morning - Friday 19th June 1863
Shields sends instructions to Brodhead to bring the Cavalry to Peavine Ridge and co-ordinate an attack with Kimbell once he arrives, which will not be until later in the afternoon.
Munford is becoming increasingly concerned about being isolated on the wrong side of Mott’s Run. His scouts has noted the approach of Brodhead’s cavalry and seeing encirclement as a real risk, Munford decides to ride out and engage the approaching Brodhead in an effort to break out.
[note - Munford passed an Initiative Test to allow him to override his orders].
On the Old Mine Road, Sullivan’s 2nd Brigade has reached Duffy’s Mill, which is defended by 13th and 25th Virginia. He attacks.
Elzey now being aware of the additional infantry brigade advancing on Duffy’s Mill, sends riders to advise Ewell of this additional threat to the right. Ewell is in fact only just becoming aware of the Munford cavalry action at Peavine Ridge the previous day.
Munford’s Action;
This is as brief as it is dynamic! The two cavalry forces of equal size, strike each other in an area of open farmland and a swirling cavalry action ensues with devastating consequences for the Confederates.
6th Virginia, facing 1st Ohio, are roughly handled, taking many losses. They retreat, but are pursued, taking further loss and then routing from the field, leaving them unfit for further meaningful involvement in the campaign.
Munford is over with 2nd Virginia on the left wing. They manage to fight off 1st Michigan, but in the clash, Munford falls from the saddle, killed by a pistol shot to the throat. Colonel Ashby steps up to take command of the brigade and immediately orders a full retreat. The Confederate cavalry brigade has suffered a telling defeat.
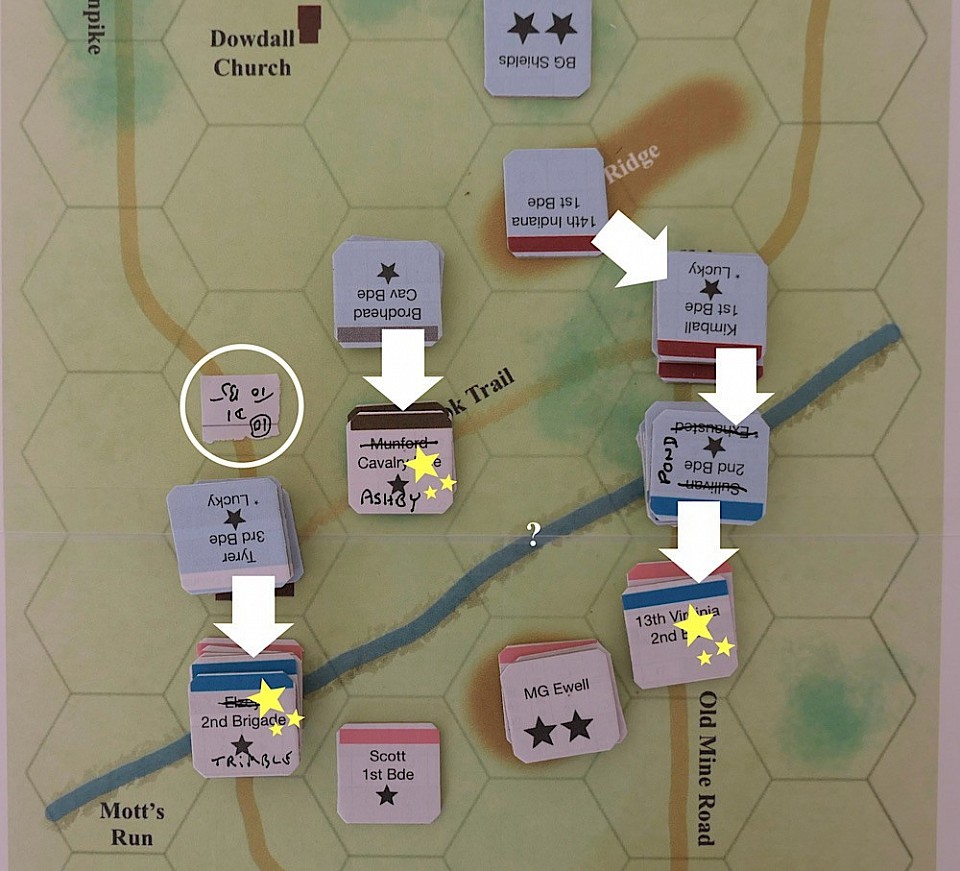
Sullivan’s Action;
At Duffy’s Mill, the smoothbore armed 25th Virgina have built a barricade across the road, giving them an excellent blocking position, while 13th Virginia in skirmish order, lines a nearby field, giving them a flanking position against any Union troops that assault the barricaded position.
Though it is a well executed trap, with a full fresh enemy brigade and their artillery, moving determinedly towards them, the Confederates do not in truth, fancy their chances today. However, the Union brigade commander is suffering from exhaustion and his command group are worried whether he was up for this fight.
Sullivan gives his main attention to the barricade, attacking before his guns have chance to take up firing positions. The lead regiment, 5th Ohio [superior] take heavy casualties on their approach.
A shot from a Virginian marksman instantly kills Sullivan and for a moment the brigade waver and become disordered as 13th and 39th Illinois turn from attacking the barricade to give their attention to the flanking 13th Virginia, located in the nearby field and who are now delivering effective fire.
Colonel Francis Pond assumes command of the brigade and manages to restore good order, but by now, the lone 5th Ohio has suffered grievously in front on the barricade.
Arguably, the Confederates might at this point be best holding their ground, but with the Union artillery now joining the fray and Confederate casualties mounting, they decide to pull back and retire towards the bridge.
The Union has gained Duffy’s Mill, but at the cost of their best unit, 5th Ohio, becoming ‘unsteady’.
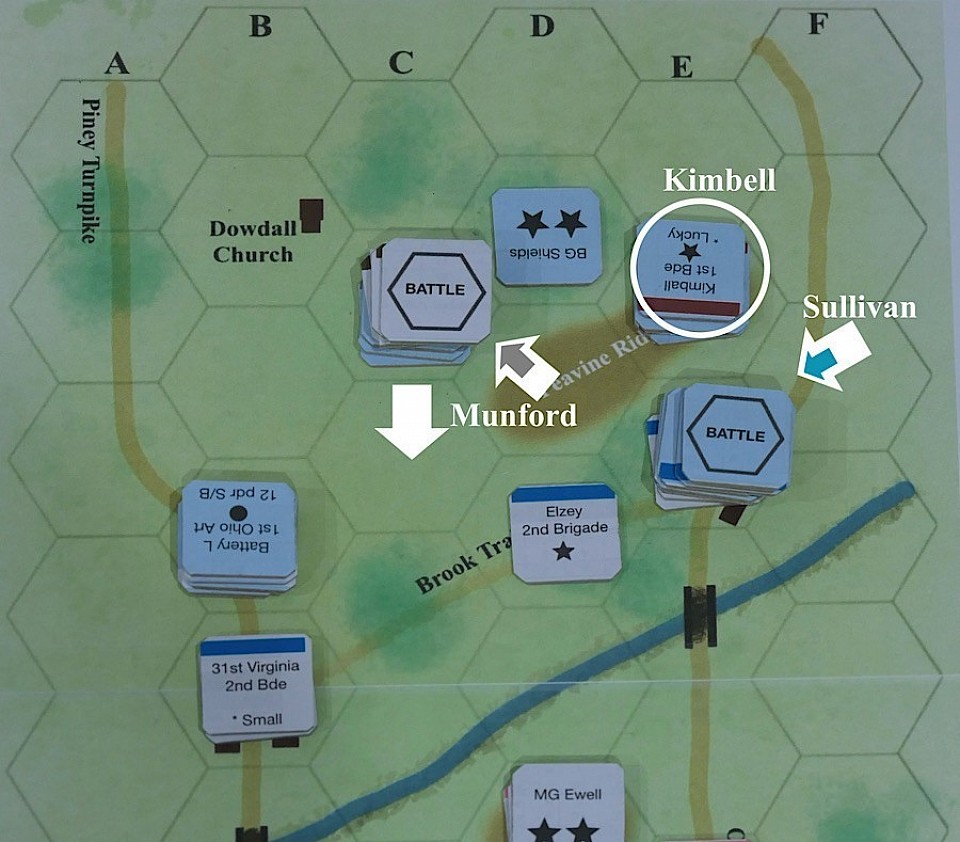
The above graphic shows Kimbell (circled) standing still, preparing for an afternoon assault along the ridge, the direction of Munford’s cavalry attack / subsequent retreat and the assault at Duffy’s Mill by Sullivan.
Losses to date;
Union - 180 rank & file. Leaders, Sullivan
Confederate - 150 rank & file. Leaders Munford

Graysville Early Afternoon 19th June 1863
Ewell is only now becoming aware that a second enemy brigade has joined the Union advance down the Old Mine Road. He immediately recalls Lusk, ordering him to bring his artillery back to Laurel Hill.
The Union are keen to keep up the momentum of advance before the Confederates can react. Pond’s 2nd Brigade attacks the bridge crossing Mott’s Run on the Old Mine Road. Kimball is following behind, though they have sent 14th Indiana off to fully secure Peavine Ridge.
On the Piney Turnpike, Tyler with his 3rd Brigade attacks Rock Spring.
Ewell believes that the bridges present the last opportunity to hold the Union advance and that if either or both of the bridges fall into Union hands, the important junction at Graysville itself will be difficult to hold. Accepting that he has not yet managed to concentrate his regiments, he thinks it likely that the bridges will be lost at some point today and he is already resigned to the prospect of fighting defensively on his side of Mott’s Run.
The speed of the union advance has caught General Brigadier Elzby by surprise. Likewise, Ashby’s cavalry has stayed forwards for too long and now look like they might be cut-off from Ewell. Brodhead’s cavalry have pursued and caught up with Ashby’s 2nd Virginian cavalry.
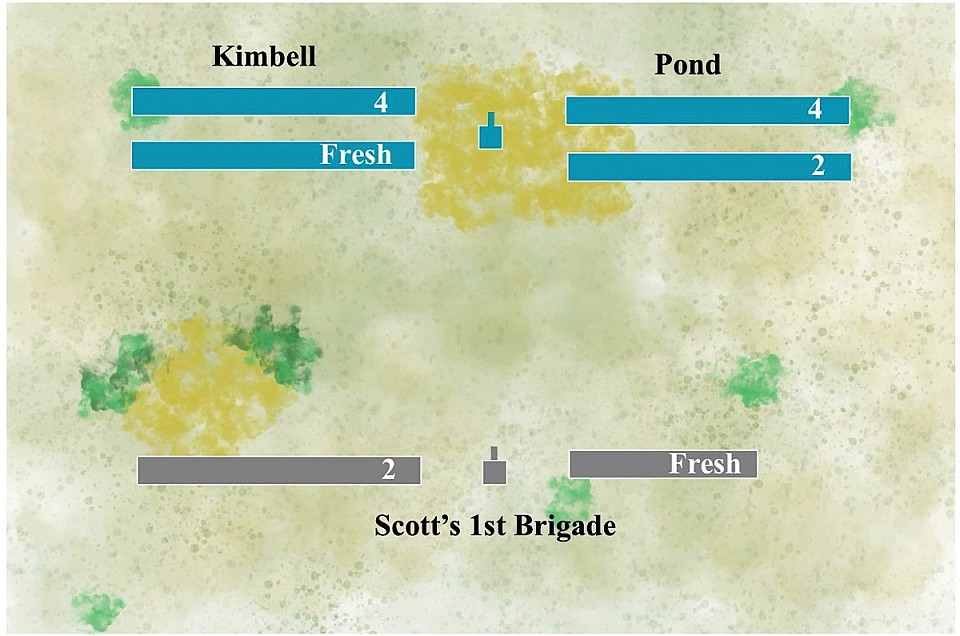
The Union attack at the bridge on the Old Mine Road.
Pond decides to keep 5th Ohio out of the battle due to the heavy mauling that it suffered this morning at Duffy’s Mill. He does have the advantage of artillery, but that aside, Shields’ insistence that Pond should keep up the momentum of advance, does come with some risks.
However, the Confederate defenders are not confident. 39th Illinois charge over the bridge and easily push 25th Virginia back. The 25th halts to stand and give a volley, but the return fire from the 39th is devastating [4 hits on 4 dice!] and 25th Virginia with grievous casualties, flee the field.
Elzey, commander of 2nd Brigade (Confederate) and his headquarters entourage have been racing through the woods to reach the bridge, fearing he would become cut-off from his brigade - but he is too late, the bridge has already fallen and Elzey finds himself surrendering to Pond!
[note - 25th Virginia are wrecked and no longer capable of contributing to the campaign].
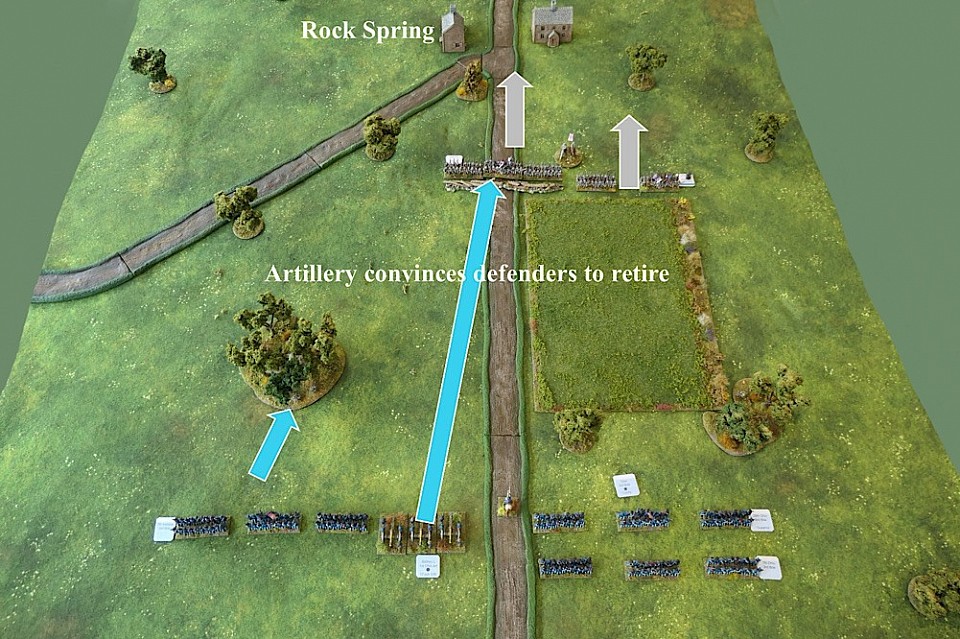
The Union attack at Rock Spring
Having sent 44th Virginia and 1st Maryland from 1st Brigade to reinforce Rock Spring, Scott the commander of 1st Brigade is aware that they will not reach Rock Spring in time to help 31st Virginia and 12th Georgia.
Suspecting that Rock Spring will be overwhelmed by Tyrer’s fresh Union brigade, Scott issues new orders. His reinforcing regiments will halt at the bridge and defend it with determination. He sends messengers to Rock Spring to advise 31st and 12th (both from Elzey's 2nd Brigade) of this and suggests that they should abandon Rock Spring and fall back onto the bridge to unite with his force there.
At Rock Spring, 31st and 12th have been out of contact with their brigade commander (Elzey) for some hours. Needing to act upon Scott’s update, Brigadier General Isaac Trimble, who is present, appoints himself as temporary brigade commander. He orders both regiments to break contact from the approaching Union forces and fall back.
Union round shot has already started to find its mark, causing casualties and consternation amongst 12th Georgia, who have many raw recruits and they need little persuasion to skedaddle! The Confederates abandoned Rock Spring and make for the bridge, taking around 30 casualties from Union guns.
On this part of the battlefield, the Confederates are certainly feeling exposed by their own lack of artillery to counter the enemy’s guns - a situation that is bound to persist, now that Lusk’s artillery has been recalled to Laurel Hill.
The Pursuit of Ashby’s cavalry
Ashby’s 2nd Virginia cavalry had been pursued by Brodhead’s 1st Ohio and 1st Michigan’s cavalry. 1st Michigan is in pretty poor shape, so they allow themselves to be screened by 1st Ohio, simply supporting them when needed.
Ashby makes a feigned retreat [Random Event], then turned and charged his pursuers. Brodhead is totally caught on the hop [failed his Capability Test!], but frustratingly, Ashby’s charge is ineffective [just a bad dice thing - a shame - this could have been an interesting moment].
The delay in Brodhead’s response allows Ashby to get away and seek the cover of the light woods along Brook Trail.
Situation
The boldness of the Union advance means that the Confederates have not had a chance to concentrate either of their brigades, which is allowing the Union to dismantle the Confederate positions in piecemeal fashion. Where there has been fighting, the dice, combined with a couple of very fortuitous Random Events, though giving a good story, has been broadly unkind to the Confederates.
Holding or at least delaying the Union at Mott’s Run is a prime Confederate objective - but this is already a fading hope.
Of note, some of the units that have been in combat since the yesterday, are showing some signs of exhaustion - having enough fresh troops on hand to feed into the action might become a deciding factor over the next 12 hours.
Late Evening 19th June 1863
A moment of decision - perhaps!
As it stands, Pond’s orders are to press on and keep the Confederates on the back foot, but with the defence starting to solidify, Pond’s 2nd Brigade runs the risk of being repulsed with a bloody nose.
His way is blocked by the 13th and 52nd Virginia, but Ewell has sent Lusk’s artillery and 5th Virginia to support the defence.
I have too much knowledge of strengths, positions and likely outcomes, more so than the commanders on the ground would have had, so it is time to make a random strategy decision on a D6.
1 - 2 Pond slides over to F5, taking an enveloping position, while Kimball moves up to the bridge, vacated by Pond. The next morning both will make a combined assault against the Confederates and try to turn their flank.
3 - 4 Pond will be decisive and attack now - hoping his run of good luck continues!
5 -6 Pond will stay in position and wait for Kimball to join him. Together they will launch a frontal assault in the morning.
The die is cast and we roll ......... a 4! Oh Dear!
Notes;
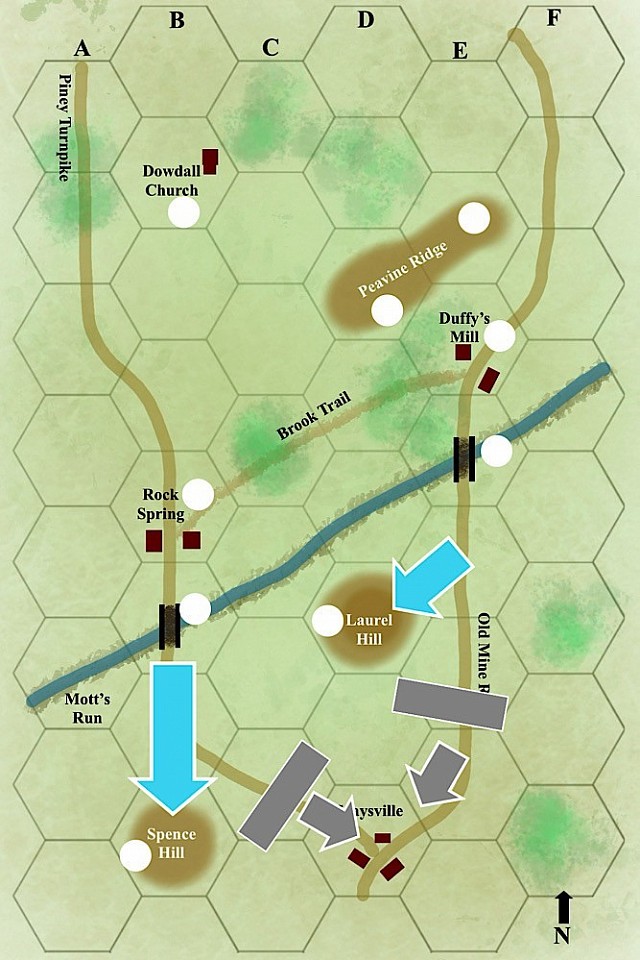
14th Indiana (Kimball) is lagging behind, having secured Peavine Ridge. It will follow on. Ashby’s cavalry is amongst the woods and trapped against Mott’s Run. He is scouting for a ford to escape across.
On the Union right, Tyrer’s 3rd Brigade will probably attack the bridge, but the numbers are fairly well balanced, though Tyrer does have artillery with him. With only a few hours of daylight left, both Ewell and Shields have a keen eye on this crossing - could this be the first moment that the Union advance is checked!
The tatty piece of paper over on the left (in B4) is a messenger with orders from Shields to Tyrer to attack at once. It will arrive in around an hour, ensuring the attack happens before nightfall.
Tyrer’s fight for the bridge.
The confederate defence is certainly starting to galvanise. Four regiments, two of them fresh, now wait for Tyrer to advance. Tyrer’s brigade is fully fresh, he also has artillery and of course, importantly, he is a ‘lucky’ general [gets two re-rolls per game].
Trimble has been putting up a credible defence ….. until getting shot! Colonel Carnot Posey takes command, but leader loss in the rules causes all units in that command to suffer two disorder markers each. It is enough for Tyrer to get the upper hand and Posey orders the Confederate retreat, his men have suffered around 80 casualties. It hasn’t all gone the Union way though - 7th Indiana have been particularly hard hit.
Ashby’s desperate defence.
Ashby is in a most precarious position. His cavalry are dismounted at the edge of woods, with his back to Mott’s Run, but his patrols have not been able to locate a ford. He faces having to surrender if he cannot fight off Brodheads cavalry.
After continuous action, Ashby is now carrying heavy losses, but Brodhead’s two cavalry regiments are likewise depleted. This is a very finely balanced situation.
Almost immediately ‘events’ bring some nuance to the battle. Brodhead is killed and replaced by Major Philip Vought, but the death of Brodhead causes both of the Union cavalry regiments to each suffer two disordered markers.
Then for whatever bizarre reason (Random Event) Ashby’s men get confused orders, break cover and move out in the open, they seem to think that they are to take the fight to the Union! Some harsh fire from 1st Michigan, has them skedaddle back into the depths of the woods.
Seeing them run encourages both 1st Ohio and 1st Michigan to pursue into the woods, but Ashby’s men are waiting for them, and rapid fire from their carbines drive the Union back out of the woods. Their casualties are so heavy that the rushed retreat turns into a rout as Vought’s men flee. 1st Ohio is completely broken and will play no further part in the campaign. 1st Michigan has been so badly mauled, that they will now be kept out of any further fighting. It appears the Union cavalry are no more!
Ashby has survived by the skin of his teeth!
Pond’s risky under-strength attack along the Old Mine Road.
Recklessly pushing on, Pond has the brigade in skirmish order. To bolster his strengths, he feeels compelled to have the wavering 5th Ohio present as a support to 39th Illinois. The confederates have just two regiments in the field, but another infantry regiment and the artillery are on the way to them. Can they hold out long enough for those reinforcements to arrive?
The Union attack unravels almost immediately. Once the long range musket fire stars, 5th Ohio refuse to advance any further and retire. As the confederate reinforcements come into sight, Pond’s forces lose heart and break off the attack - 5th Ohio go into full flight, even Pond's personal intervention cannot stop them.
Night of Friday 19th into Saturday 20th.
In their respective headquarters, both commanders are concerned about the growing exhaustion of their men. For the Union, there is some comfort that the advance continues with Tyrer having taken the second bridge, but he is matched to his front by equal numbers.
Pond’s advance has been both unnecessary and costly. But now with Kimball’s brigade joining him, Pond is told to resume the advance, while Tyrer is told to take Spence Hill. Shields does not believe that operations can continue much beyond the morning, but he is determine to take and hold some defendable positions beyond Mott’s Run.
On the confederate side of things, Ewell has at last managed to galvanise the defence, but he doesn't have any more reserves and his losses during the day have been unfortunately high. His men are ordered to hold, more in the hope that the Union attack is running out of steam than of any conviction that he can ultimately keep hold of Graysville.
Casualties to date.
Union 440 men with the leaders Sullivan and Brodhead lost
Confederate 400 men with the leaders Elzey, Trimble and Munford lost
Morning - Saturday 20th June 1863
Tyrer, Pond and Kimball push on beyond Mott’s Run with their brigades along their respective avenues of approach. On moving out from Mott’s Run, both of Shields’ wings find themselves facing Ewell’s blocking forces.
Pond and Kimball’s brigades, advancing along Old Mine Road, fall upon 13th and 58th Virginia, who are supported by Lusk’s artillery. Scott has decided to keep the wavering 52nd Virginia out of the Confederate line to protect them from further loss.
On first glance at the map, it might look like the Union must surely be about to sweep the Confederates to one side, but they are carrying heavy losses (the losses are marked on each unit on the map) and the outcome of this fight is by no means certain. It may largely depend on the skill of the Confederate gunners of Lusk’s battery against the determination of the Union to advance against that fire.
Lusk’s guns open up on Pond’s Brigade, which hesitates under the fire, while Kimball on the Union right make good progress. There is some confusion with the Union artillery orders, which has kept their guns out of firing position for almost half an hour - they are desperately needed to counter the Confederate guns. As they sort themselves out, their opening counter battery fire on Lusk is so successful, it forces the Confederate guns to pull back. Around the same time, Colonel Scott falls, fatally wounded, leaving the brigade in some disorder - is this the turning point in the battle, giving the Union the edge they need!
Lt. Colonel James Skinner assumes Confederate command.
Though the Confederates are on the ropes, the Union have taken heavy casualties with most falling on the fresh 67th Ohio and they are starting to waver.
Skinner has a tough decision, whether to brave the onslaught in the hope of breaking the Union attack or should he fall back now and protect the brigade’s cohesion - in the end the decision is made for him as 58th Virginia also start to lose ground.
Pond and Kimball hold the field, but as Shields had suspected earlier, this wing is spent and will now have to go onto the defensive. The Union have lost around 100 men in this action, while the Confederates lose 90 men, a couple of guns and the redoubtable Scott …… but importantly, it has been the action that has finally checked the Union advance along the Old Mine Road.
Over on the Union right wing, Tyrer, moving down the Piney Turnpike has the advantage that the defenders before him do not have artillery support. He chooses to keep 7th Indiana in reserve as they are wavering, but 7th and 29th Ohio are both still fresh and it is with good reason that Tyrer is confident that the Confederates will fall back in the face of his approach.
Both sides settle into long range skirmish fire while the Union artillery draws up close to the Confederate positions, unleashing punishing fire on them.
It is all too much and as Tyrer predicted, Posey does not waste any time in pulling his men back, though the eagerness of Tyrer to pursue was somewhat dampened by the losses sustained by 7th and 29th Ohio in this action.
Early Afternoon - Saturday 20th June 1863
As the fighting dies down, the Union allow the Confederates to disengage. They are in no condition to press the Confederates further. Graysville will stay out of reach. In compliance with Shields orders at the previous midnight briefing, they move to secure Laurel Hill and Spence Hill, giving the Union a defensive anchor on the far side of Mott’s Run.
Ewell has ordered all the elements of his division to fall back upon Graysville, where their concentration can ensure that the current stand-off continues until reinforcements arrive for either side or one of the respective commanders is ordered to give up their ground and re-deploy further back - they can but wait and see!
The remnants of the Confederate cavalry under Ashby, finding themselves stranded on the other side of Mott’s Run, has infiltrated deeper into enemy lines with a view to make a circuitous journey behind the Union lines that will eventually allow them to return to friendly territory. The near destruction of the Union cavalry yesterday will no doubt significantly help them evade interception.
The white dots on the map show Victory Point locations that the Union can claim to have taken.
The Diaries of the Divisional Commanders
At the start of this campaign, with its random elements, there was no certainty at all as to how the campaign might end or how close the Union would come to capturing Graysville.
While it might be argued that the Union force was under powered for the task, they came extremely close to achieving their goal, something that the Confederate side felt was quite likely as the Union reached Mott’s Run and the Confederate division was still divided between defending the two bridges.
Had Pond not pressed on alone at the bridge instead of waiting for Kimball, the Union might of delivered a knock out blow with a joint attack, allowing them an easier passage to Graysville. Shields writes ‘Pond, for all his enthusiasm, lost our advantage when striking alone across Mott’s Run, but I must accept responsibility for putting that enthusiasm to full use, in encouraging an aggressive advance’.
The taking of the bridges by the Union and the hills behind Mott’s Run, ensured that even without taking Graysville, the Union would win the game on victory points alone (8 points Vs the Confederate 4). If the Confederates could have just held onto one of those hills, because they score higher victory points for the hills (3) than the Union get (1), the result would have been a 7 - 7 draw, so everything really did just get settled in the last moments of the fight, which makes me feel that the campaign was fairly balanced and I would happily re-run the campaign at some future point, especially as the opening could go in different ways.
On that note, it is worth reminding ourselves that this campaign started as a result of the motivation gained from the Charles Grant ‘Programmed Scenarios for the Wargamer’ book. The pre-programming of unit responses with some randomising of decisions built into that, including initial random deployment and battle plans, took all certainty away and helped the enjoyment of solitaire play, as the opening narrative is response driven.
Once under way, the campaign took on a life of its own, but it became useful to do another response test again when it was late evening on the 19th at the bridge. As mentioned above, Pond had to decide whether to continue the advance unsupported or wait for Kimball. The result of his reckless (but encouraged) advance, while viable was not the option that this solo player would have willingly chosen, so again, I became indebted to the randomised ‘response’ mechanic, pushing me and the story line in a different direction.
All of the games were played on a 4’ x 3½’ table with the Warlord Games Epic figure range. I would normally use two bases per unit, but the unit density was low enough throughout, that I was always able to use three bases per unit and the game looked much better for that. ‘Small’ units, such as 31st Virginia, were represented with two bases.
When artillery was involved, both sides started play at maximum artillery range, so that there was an opportunity for artillery to have an effect before the lines closed and so a proper advance to combat sequence was observed. The artillery was not always effective, but Ewell writes ‘had I had another battery of artillery available, so that both roads could have been better protected, I am certain that we could have held the Union at Piney Turnpike bridge’.
All the games were played with my own rules, which give a fairly quick game. The rules got a few tweaks along the way as things got raised, but overall they held up fine. In particular the accumulation of HITs that carry across from game to game worked very well and it is the mechanic that brought us wavering and exhaustion.
At the end of each battle, all units remaining on the battlefield, each took a Competency Test (close to what Morale Tests do in other sets). If a unit passed, it could cancel one of its hits, but the first two hits of a unit can never be reduced. This seemed to be the right balance of keeping units in the fight long enough that the brigades could fight over the three days, but after that time would increasingly be likely to waver and then collapse.
Having a small do-able campaign that works solo on a home table, is great way to get some linked smaller games and a bit of narrative going without anything becoming too burdensome or complicated. In each engagement decisions have to be made as to what point to flee the field to save the force and then of course there is the playing of the two turns of disengagement and the extra losses and difficulties that can come from that. They become important turns in observing the full story and is something that can be lost in stand alone games in which one player can just call the game, conceding defeat.
Thank you to everyone who has stuck with this or bravely read it in one go with a coffee in hand!
