Recent Games
Victory in the Pacific
An oldie but goodie went onto the table last night for our face-to-face game. Victory in the Pacific is an old Avalon Hill game that covers the WWII Japanese / Allied actions in the Pacific from start to done.
It is a straightforward but longish game, so we decided from the outset that we would play the game over two sessions and the art of doing that is picking the right moment to stop, so that a decent second half can still be had.
In our game, the Japanese put everything into the attack at Pearl Harbour, at the cost of exploiting some other areas of the map and on balance that worked very well, with significant harm done to the Allied battleships at Pearl.
The Japanese launched an early attack into Indonesia and though they were very badly mauled by the Allied forces there, the tenacious fighting by both sides had also seriously diminished the Allied fleet and as the Japanese limped away, those losses were worrisome for the Allies.
A little later at the Marshall Islands, the Japanese had sent a very modest force to the Marshall Islands, supported by one small carrier and the support of ground-based aircraft. They were shocked to find themselves facing the overwhelming might of U.S. forces in the area and a very one-sided battle looked to be on cards...... however! In a stupendous victory, the Japanese air forces, together with submarine assistance, were able to sink three Allied carriers!
It allowed the Japanese to retain control of the Marshall Islands and this seemed like a good point to halt the game and record positions for a second playing.
The Allies had the better Victory Point score, through still having wider control of the Pacific, but they had lost much of their carrier capacity and so it seemed that this was the point of the game at which the test would be how well the Japanese could manage expansion and to what degree the Allies could limit that.
We felt that despite not having the best position on the Victory Point track, overall, the advantage looked to be with the Japanese and so it was a good place to park the game for a future return.
Part II to follow soon
***********************************************
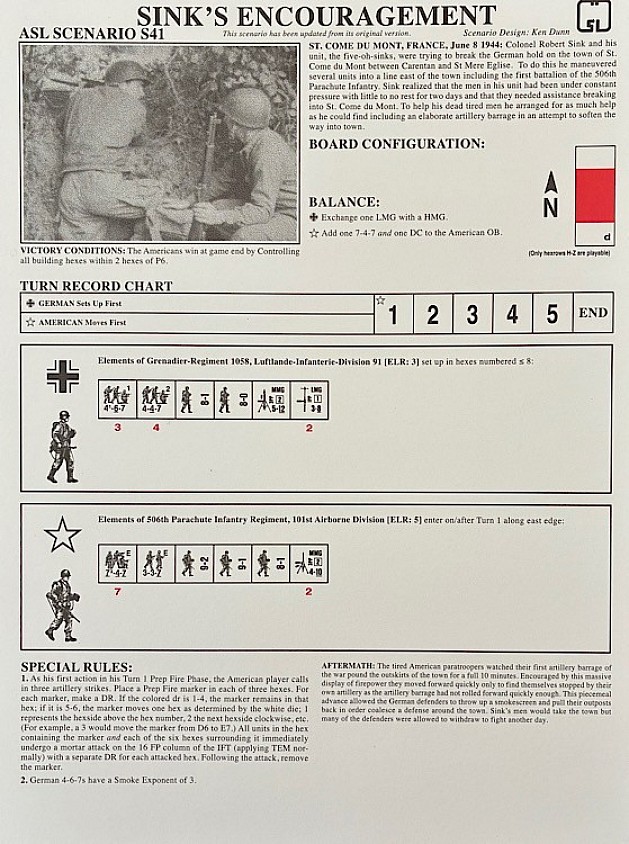
ASL(SK) fight for St. Come du Mont
This is Advanced Squad Leader (starter kit) scenario s41 - called Sink's Encouragement (8th June 1944) - designed by Ken Dunn.
This town sits between Carentan and St. Mere Eglise and elements of 1st Battalion of 506th Para (American) are ordered to attack. Their commander, understanding that his men were tired after 2 days of continuous action, arranged for artillery support.
In full ASL, I recall that the artillery rules have some complexity to them .... benefitting from a flowchart to assist!
While off board artillery has not been covered in the starter kit series, it is given some utility in this scenario by a simple hit / scatter die roll and where the fire lands, that and all adjacent hexes are attacked on the 12 Fire Power column. There are 3 such fires at the start of the game, targeting German positions.
The artillery was pretty effective - especially as the squad with the MMG broke, this team had been covering the central building and had good fields of fire.
Even so, there were enough Germans scattered amongst the remaining buildings to cause the paratroopers to advance cautiously, mainly via the orchard. The paratrooper collective fire cut up the defence leaving importantly placed German squads broken.
However - they had taken too much time to get to this point and the victory conditions of capturing all of the town's buildings within 2 hexes of P6 started to slip from reach ..... and so the paratroopers, confident that much of the towns defenders were in a broken state, advanced on this part of the town.
Of course, it all unravelled ... well it would wouldn't it!
The paratroopers' attempts to use smoke grenades all failed - then the MMG team recovered and finally in a close combat amongst the buildings a German defender saw off an attacker despite being out-numbered 2:1.
A situation of several broken German squads that made the edge of town look like a door waiting to be kicked open, instead came to life and the paratroopers ended up with broken squads everywhere with no hope of securing the building.
Play time - just under the two hours mark.
Complexity - I still had to double check some 'Final Fire' stuff, ELR, smoke placement and what does a squad do when their leader breaks, but outside of that, everything was quite straight forward and these rules are bedding in now ...... well, for infantry anyway :-)
All-in-all, this was a good fit for a Bank Holiday afternoon.
********************************************
Easy Antietam!
The recently released Blue & Gray Deluxe boardgame, which contains reprints from the old SPI Blue & Gray quads I and II, went onto the table, with the Antietam battle being the one that I fancied the most for a trial game.
It played rather well, making for an engaging game.
I have put an AAR up on the Battlefields & Warriors Blog, link below, which has a closer look at turn 1 and then just gives an overview of the rest of the game.
As a starting experience, it certainly makes me keen to a) replay Antietam with some of the optional rules and b) to get the other scenarios to the table.
Just good old fun.
LINK
https://battlefieldswarriors.blogspot.com/2026/03/antietam.html
******************************************************
The Beast of Argentan
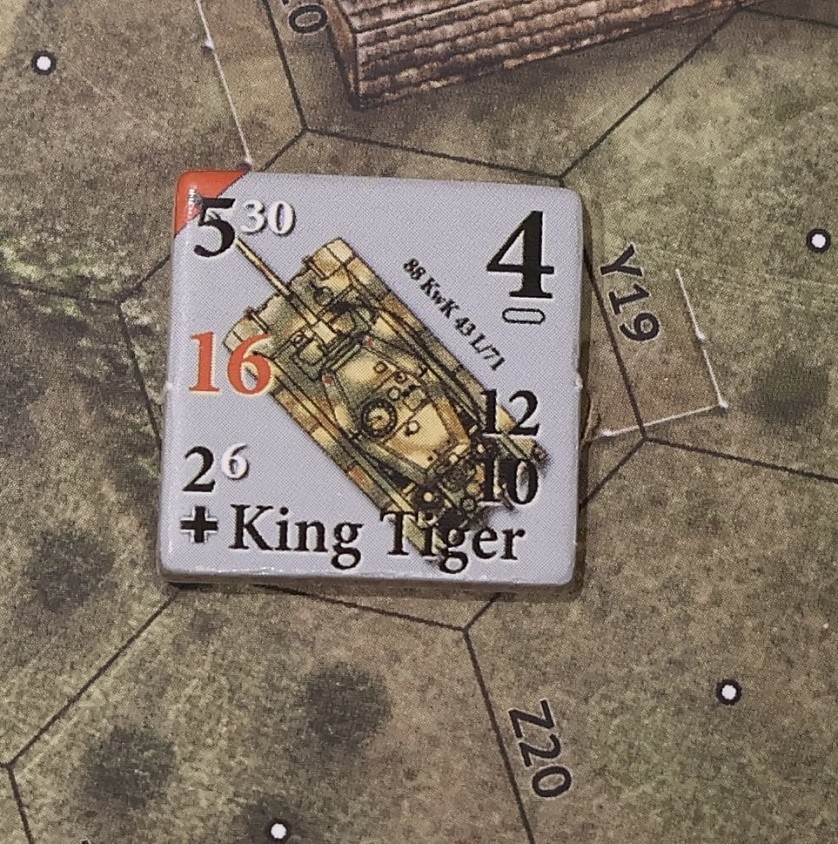
An Old School Tactical (OST) scenario from the Western Front ‘44 / ‘45 module and the Scenario - The Beast from Argentan, which is 12 turns long and covers a typical action from the period of fighting for the Falaise Gap, where the allies were about to pocket two German armies and those German formations closest to the town of Falaise were attempting to break out before the trap snapped shut!
There is quite a lot going on in the scenario, but basically both sides enter the board and it is the American task to set up blocking positions to stop the German infantry units pushing through them and escaping off the board edge.
‘The Beast’ we can assume is the lone Tiger II that has joined the German exodus. Will it be a match for the 7 armoured vehicles that the Americans have to hand?
There is a write up as to how the game played out, on the BoardGameGeek forum. It can be accessed via this link;
https://boardgamegeek.com/thread/3634710/the-beast-of-argentan-replay
****************************************************
Mariazell - attack on the flank
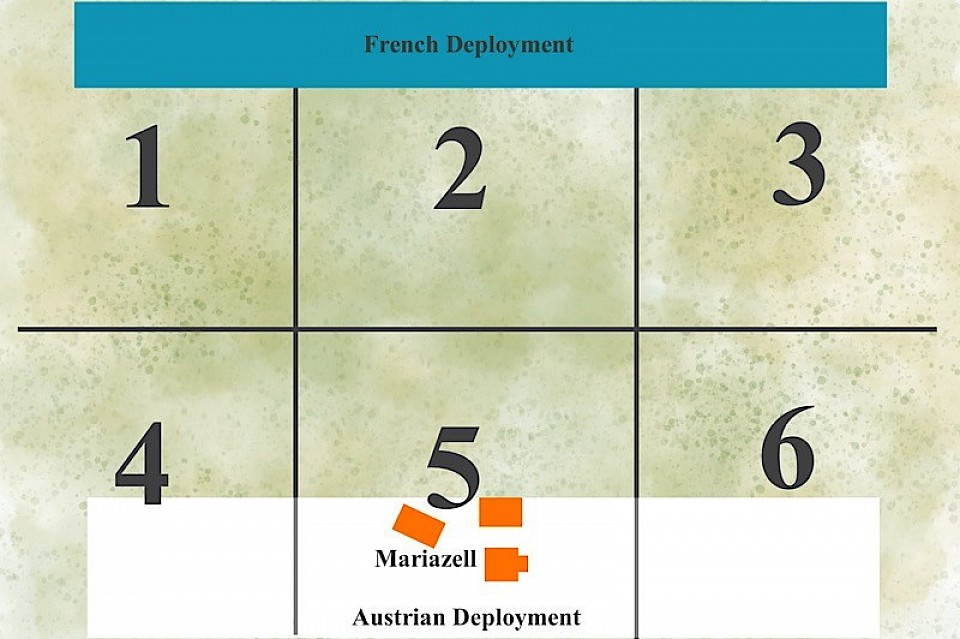
I spent a pleasant Sunday, going into Monday, doing the first play test of my Mariazell scenario for the Sons of Napoleon rule set.
It was in fact draft 2, but now on reflection, I wish I had tested draft 1 first as I think that was closer to representing the fatigue of von Merveldt’s Austrian Division. On our table, the Austrians had two infantry regiments on the left, the Grenadiers in Mariazell in the centre and on the right were the Grenzers and a 6pdr gun battery.
While Mariazell itself is a fixed location on the table, a wood (ending up in area 3) and two large fields were randomly placed …… already an unravelling was in the making!
During the game, Mariazell was not attacked. The four French infantry regiments attacked the Austrian left and though inflicting harm, they were heavily bruised and repulsed in the fighting. So today we will be just looking at the Austrian right flank as this from a systems and outcomes point of view, I found the most interesting.
At start, the Grenzers are allowed to deploy one of their three infantry regiments in the woods … wherever that might be (random placement). They chose to do so, even though the woods were on the French side of the table - I thought it might slow the French down, especially as their force consisted of a lone Chasseur á Cheval (Light Cavalry) regiment and supporting 6 pdr Horse Artillery.
The French deployed on their table edge ….. within musket fire of the woods!
Of course the Grenzers in the wood duly fired upon the limbered horse artillery, compelling the guns to unlimber with the intention of raking the wood with close range cannon fire.
But the Grenzers fired again, before the now unlimbered artillery could respond, inflicting enough harm to disorder the artillery. Disordered units do not perform well in this system and if the disordered guns were to trade fire with the Grenzers, being only 2 bases strong, they would quickly come off very badly …. So, they spent some time trying to rally off the damage, which simply allowed more Grenzer fire. In the end, the artillery had had enough and routed off the field.
That was a lesson!
Number 2 lesson was that the now lone Chasseurs were very limited as to what they could do on this part of the battlefield. They can’t enter woods to go after the Grenzers there and if the other Grenzer infantry go into square, they would be proof against the horses. The only other choice would be to go for the Austrian guns ….. What a choice!
The Austrians saw the potential threat to the guns, so they turned the artillery towards the horse and moved one infantry regiment forward to cover the battery’s flank. The other Grenzer infantry unit did go into square.
The Chasseurs felt really hobbled, ideally they would / should just retire and leave the table …. Alive! But here, as with most systems, leaving the table counts as a unit loss.
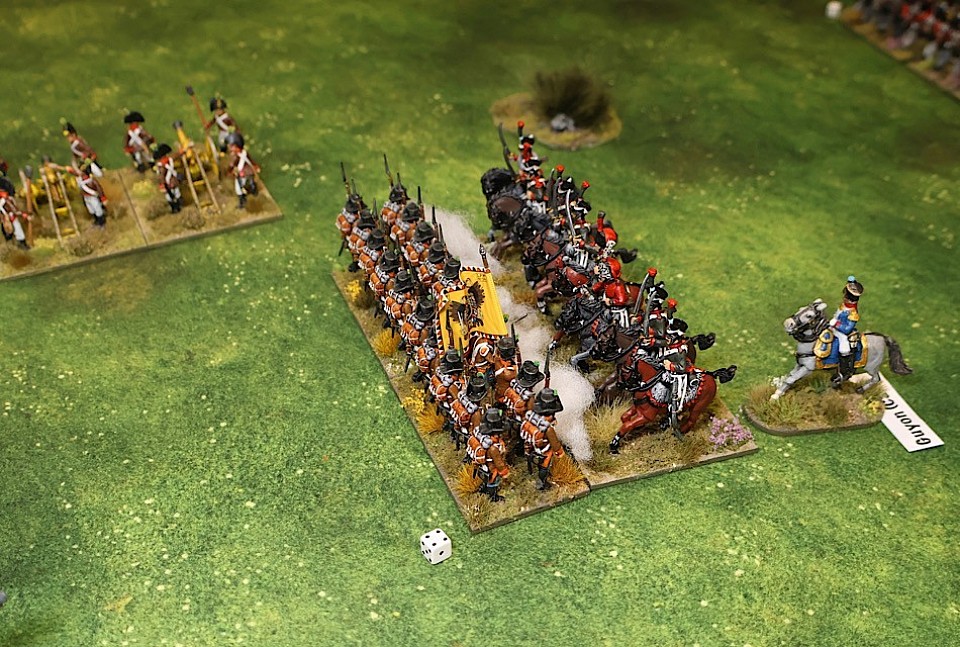
The cavalry charge!
The Austrian infantry moving forward had in effect closed the gap with the cavalry, who immediately took a charge test and passed. They charged straight in to the Grenzer infantry standing in line! It wasn’t pretty, the Grenzers suffered heavily and were forced back.
The Austrian guns were now exposed and a successful cavalry charge would see them off. As a result both sides spent their remaining playing cards trying to get an advantage between the artillery and the cavalry. The Chasseurs did manage to get a charge home on the guns, but the subsequent melee was a draw, causing the Chasseurs to fall back. Had they won, even by just 1 point, the guns would have been seen off - a missed opportunity, but one down to Lady Luck.
Of course all of this frenzied spending of cards for orders to sort that fight out meant that I had totally overlooked the need of the Grenzer infantry recently hit by the cavalry, to rally off their damage. Come the end of turn phase, those Grenzers were just carrying too much damage and they were routed from the field!
By this time, the Chasseurs were down to just two bases of horse. They were in a dire situation, even if they retreated, they would be hit by artillery …… better to go down in glory, one last charge on the guns!
They passed their charge test, but rolled poorly for the random element of the charge movement and their charge fell short of the guns, who wasted no time in firing canister at the horse, routing them from the table.
The loss of the horse and the Victory Points that it gave the Austrians assured that the French Break Point level had been reached. Nothing else on the table could save them, the game ended in an Austrian victory.
Really, if the scenario were working properly, the French left wing would have been a side show. The real tussle should have been with their infantry on their right, who should have been able to carry the day for the French side.
Oh well, back to the drawing board, but in my next game, I will be more thoughtful when dealing with infantry in woods and those two Austrian Infantry Regiments will need to be a little more brittle if the scenario is to feel right
******************************************************
First hours at Gettysburg
This is an opening scenario taken from First Day at Gettysburg, published by Revolution Games as part of their Blind Swords series.
It covers the action from 9 AM to 11:30 AM as Heth makes first contact with the Union outside Gettysburg.
The photo on the left shows the high watermark of the Confederate advance. Union reinforcements have arrived and they are pressing the Confederates, who are compelled to pull back.
By the scenario end, they still manage to hold on to the 'Union side' of Willoughby Run, with their guns behind them, back up on Herr Ridge. It ends as a Union victory.
There is some meatiness to the system and it can take a while to play. This was our first dabble with the system for a few years, so we were a little rusty, but our broad view was that we felt that while we really liked what transpired on table, it had felt too complicated for its own good. Too much goodness I would say, but while I find myself wanting to love this game more than my practical circumstances allow ..... I also think that this might be an unfair moment to judge as I am still going through the learning curve and I wonder whether with more regular play, a lot of this would just automatically click.
It might be interesting to play another game in the system (which I have) to answer my main question of whether via the exclusive rules in each game, there are just too many differences mixed with loads of similarities in the rules that might make moving between each game harder than I am looking for at the moment - so there is more to explore here.
************************************************************
An Operation Sealion game
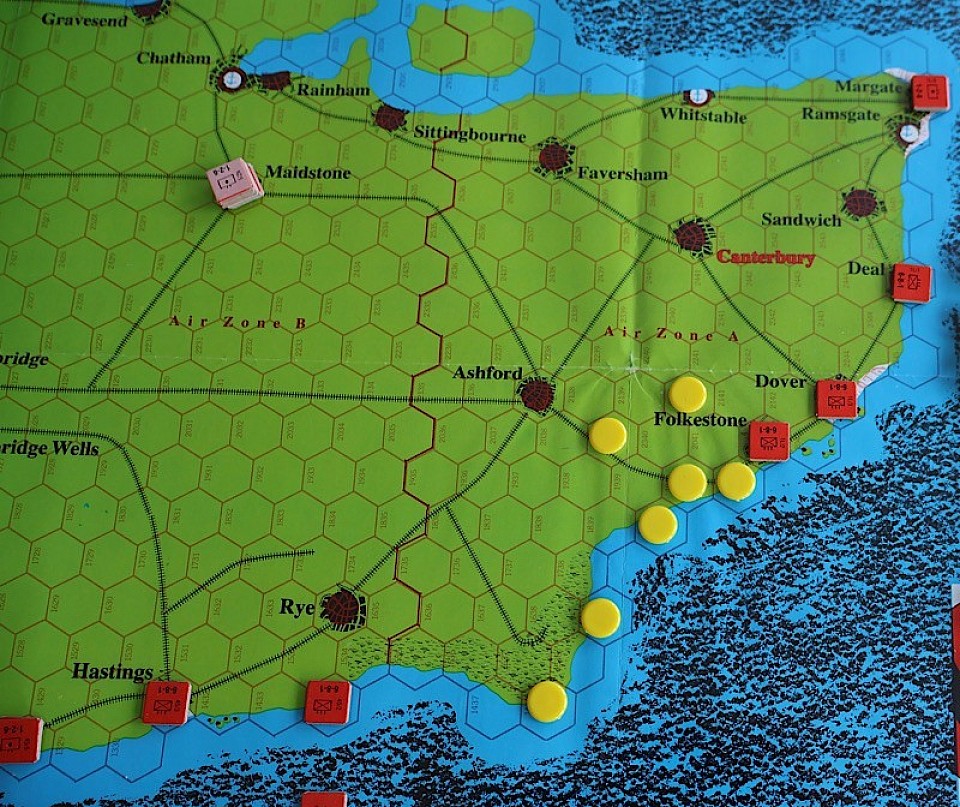
This is part of the map showing southern England. The game is Fight on the Beaches, Volume 40 of The Wargamer Magazine - published in 1985.
I have been reading the book 'Sealion' by Richard Cox, first published in 1975, which gives a narrative of the German invasion of Britain and itself is based upon a wargame that was carried out the previous year at the Sandhurst Military Academy, to test this great 'what if'.
Here we have the very opening of the game. The German player must secretly identify 5 landing beaches, 1 air drop zone for 7th Fallschirmjägers and 1 landing zone for a glider division.
As I was playing solo, I used yellow tidleywinks to mark those places, so that I would remember them for the rest of the games, as those sea hexes are where German reinforcements come in.
The next stage is for the British to make some limited movements, representing the poor intelligence that the Germans had about British defensive positions. Then 15 land based German regiments will hit the beaches and the paratroop and glider divisions will drop inland.
The turns represent half a day, so here we getting ready for the period of say dawn to early afternoon. It is essential that the Germans should capture a port as early as possible and from this invasion point, Folkestone is the obvious target.
***************************************************
Action at Skenfell Mere
Some time ago, I played this hrow down scenario to get familiar with the Hail Caesar rules. Recently, I have been exploring an old 1989 set of ancients rules by Irregular Miniatures, which have the entire system presented on a number of index sized cards, colour coded to match the sequence of play.
I thought it a good benchmark to return this scenario to the table and see how the Irregular Miniatures rules compared to Hail Caesar.
This time I got a different winner, but overall the margins of actual play between the two rules sets were fairly close, leaving me to jump off the fence in favour of one, rather than there being a clear winner.
An ongoing sore back raised its presence and I must admit that towards the end of the game, I just wanted the game to end as I became increasingly uncomfortable. This raises an issue of perhaps going for smaller games / faster rules and this might be something that increasingly informs how I view successful gaming and whether the rules work for me!
Game notes, pictures and conclusions have been posted over on the Battlefields & Warriors Blog for those interested.
Link;
https://battlefieldswarriors.blogspot.com/2025/08/the-battle-for-skenfell-mere-1471-again.html
***********************************************************
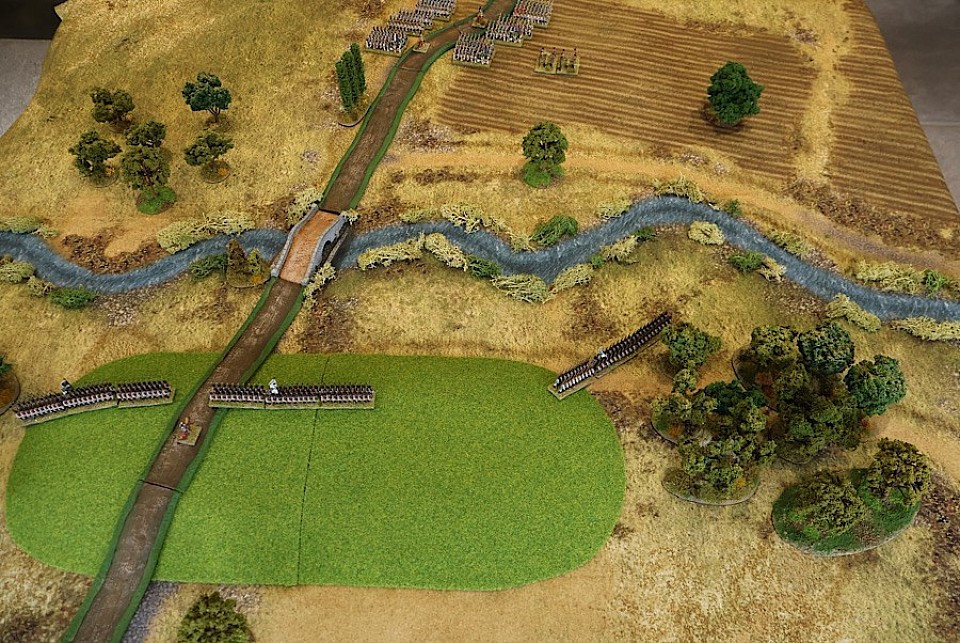
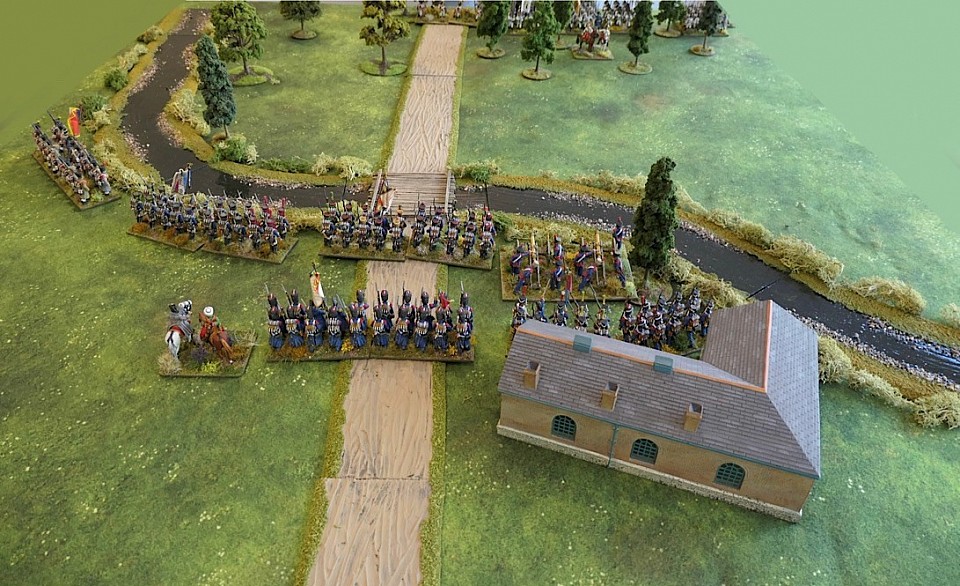
A Rearguard Near Gilly - 15th June 1815

This scenario was put together just to give me a way to get my first three painted Prussian Epic battalions to the table.
Background.
As Napoleon’s French troops crossed the Belgian border, a series of skirmish actions erupted as small Prussian outposts were pushed back in by the advancing French. The weight of the advance made it clear that this was the main part of the French army and the Prussians decided that the forward elements of Zeiten’s I Corps should fall back and concentrate at Gilly.
Not far from Gilly, the Prussian 28th Infantry Regiment was positioned on a rise behind a stream on rearguard duty. They would soon be overwhelmed by the French. It was their task to delay the French, but also to retire intact as a rearguard and maintain the cohesion of the regiment.
The letters 'F' and 'M' on the above map refer to the Prussian Fusilier and Musketeer battalions. They each count as ‘large’ units. The Prussians also get a company of Jäger infantry that they can place anywhere on the table that is also on the friendly side of the stream. The regiment is commanded by von Hictenbrock.
Opposing the position, Général de Brigade Billiand (1st Brigade from Lefol’s 8th Division) has two French line infantry regiments, the 15th Light (Brice) and the 23rd Line (Vernier), each of three battalions, with a battery of foot artillery for support.
Neither side has cavalry and only the French have artillery.
This will be a seven turn game. The French get 1 Victory point if reaching the far end of the bridge by the end of turn 3 and 1 VP for every French battalion that exits the road (to Gilly) on the Prussian edge of the table. The Prussians will get ½ VP for each battalion (not the jäger company) that voluntarily moves off the map at the friendly road exit (to Gilly) after turn 5. Both sides will score 1 VP for each enemy unit (not jäger) that is forced to retreat or rout off the table or that is removed from play due to casualties. The side with most VP’s at the end of the seventh turn wins. On a draw, the Prussians win for their rearguard doing well against such odds!
The Prussians will need to decide at what point to abandon the position and retire ..... if they are lucky enough to get that choice!
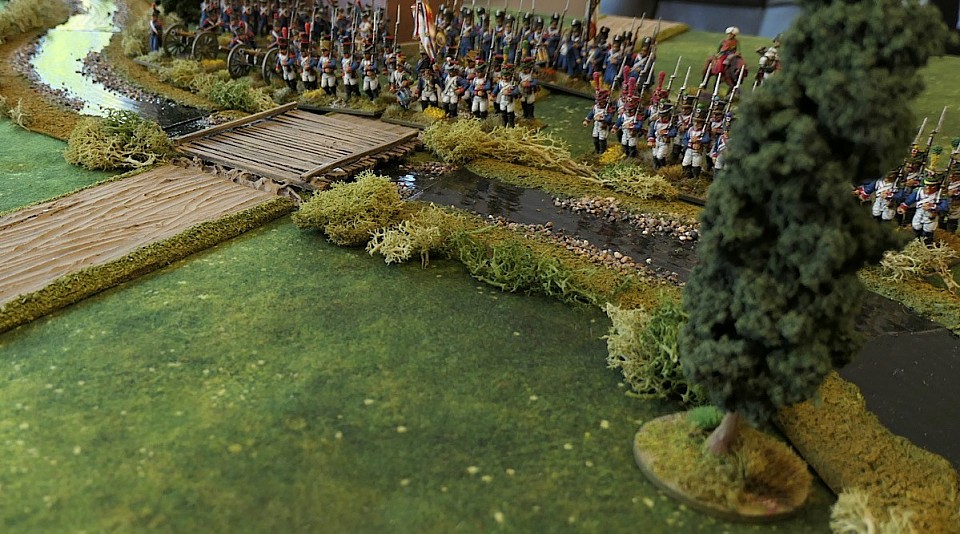
The stream is a crossable to infantry, but they must stop when first entering the water and become disordered. The artillery can only cross at the bridge.
The scenario is not too demanding on space, time or collections and particularly suits our Prussian starter force.
The Action
I dice for where the Prussian Jäger should go and they are placed in the woods on the Prussian left.
Turn 1. The musketeers in the Centre of the Prussian line (1st Battalion) take artillery fire and nervously fall back disordered. A Random Event has caused the 2nd Musketeers to be marked ‘Out of Command’, so they cannot move to cover 1st Musketeers abandoned position. Has the Prussian position unravelled so soon! The jägers advance out of the woods and line the banks of the stream.
Turn 2. The French change from column into line and advance, getting ready to attack. 15th Light Regiment (3 battalions on the left) enter the stream to attack the high ground ahead, with their 3rd Battalion staying in assault column to strike at the Fusileers. On the right, 23rd Light Regient likewise with 3 battalions on the right of the road, enter the stream to advance against the high ground, while their 3rd Battalion stays on the road, intending to capture the bridge.
Turn 3. The French attack gains momentum, but importantly, the fire from the fusiliers on the Prussian right, throw 3rd Battalions assault column back with heavy casualties. The French light regiment do however capture the bridge.
Turn 4. The French now closing on the Prussian line, halt and fire at the ridge. Both 1st and 2nd Musketeer battalions reel backwards and Vernier’s 3rd Battalion on the French right, moving up the road, get a foothold on the ridge. The two musketeer regiments counter-attack. One fires in support and the other charges to contact, but their assault stalls due to the weight of French defensive fire and the Prussians fall back again.
Turn 5. The Prussians are ordered to start their retreat towards Gilly, but the Fusiliers on the Prussian right are struggling to disengage. Facing them and once again back in the stream, Brice’s French 3rd Battalion despite very heavy losses, charge out from the stream and surprisingly send the relatively well ordered fusiliers stumbling back into the woods. With three French battalions now on the ridge, the fusiliers look like they are about to become isolated and trapped, unable to get to the Gilly road. 1st Musketeers voluntarily leave the table via the Gilly road, with 2nd Musketeers now at the table edge ready to follow them off.
Turn 6. On the French right, they push the jäger back and a battalion moves down the rear of the ridge towards the road exit, just in time to see 2nd Musketeers leave the table towards Gilly. On the French left, 3rd Battalion who had done a remarkable job in returning to the fray and pushing the fusiliers back, had by now lost all cohesion due to losses. Their morale failing, they routed from the field. The fusiliers attempt to move towards the road, but the now unengaged French Infantry are too thick on the ground - the fusiliers will not be able to escape.
Turn 7. The French 3rd Battalion exits the road towards Gilly. Four other French battalions are not far behind and are ready to pursue the Prussians all the way back to Gilly. The fusiliers, cut off, are forced to surrender.
Casualties in the game. The French suffer 160 losses and the Prussians 170 losses.
Victory Points.
The Prussians get 1 VP for exiting the two musketeer units and 1 VP for causing the rout of a French battalion for a total of 2 VPs.
The French get 1 VP for taking the far side of the bridge by turn 3, another 1 VP for the capture of an enemy battalion (the fusiliers) and a third VP for exiting a battalion off the Gilly road, for a total of 3 VP’s, so a French win.
I thought that considering how few units the Prussians had, that the scenario gave an entertaining game. There were some moments in which fortunes might have changed. For example the Prussian fire at the French crossing the bridge in turn 3 was abysmal. They could have easily inflicted harm on the French column and seen it hurled back to the other side. Likewise, the fusileer battalion should have been re-positioning itself earlier, moving nearer towards the road. This might have got the fusiliers away from the French gunners sights and made it harder for the French to secure the hill, while getting them closer to their escape route.
There are more game photographs at the blog LINK
https://commanders.simdif.com/dear_diary.html
****************************************************
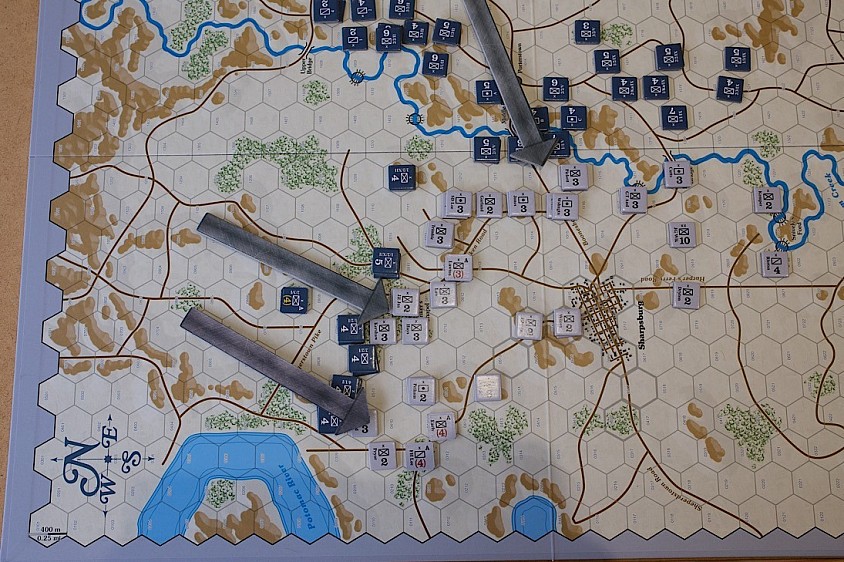
Fight for Quatre Bras
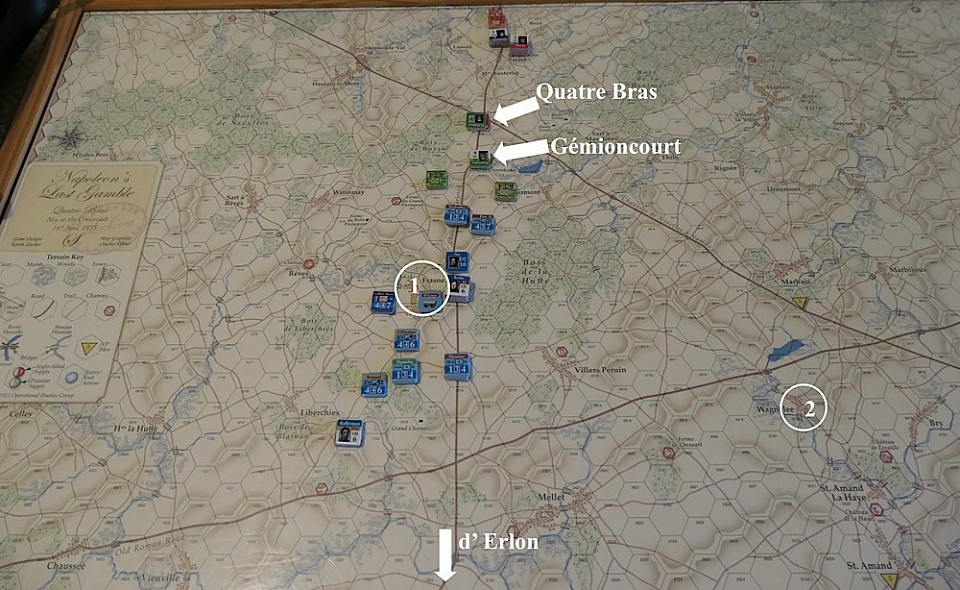
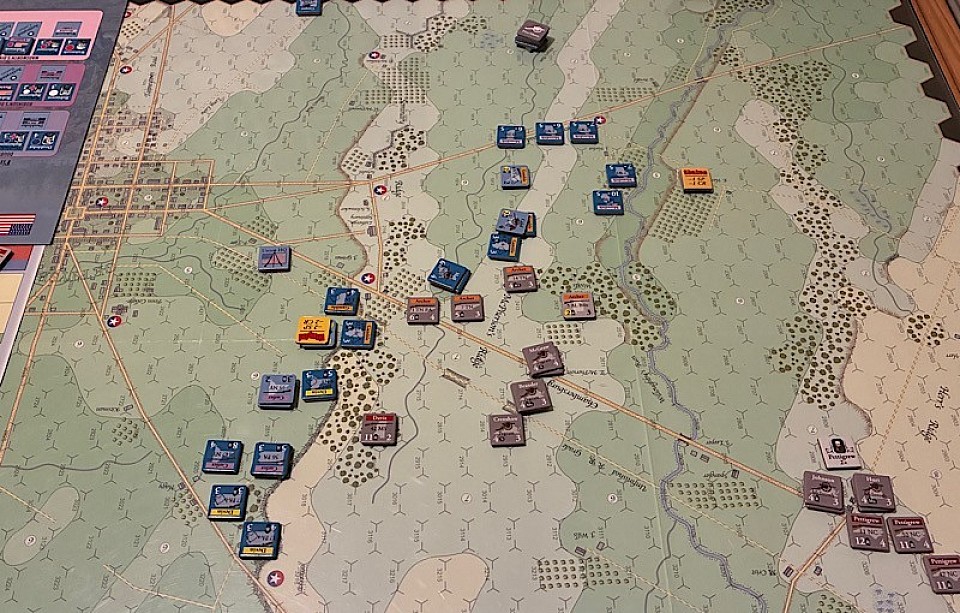
Last night we played the Quatre Bras scenario from the Napoleon’s Last Gamble package (OSG).
Historical Background - The French (Ney) task is to pin Wellington’s Anglo-Allied army in place while Napoleon with the rest of the French army attacks the Prussians over to the right at Ligny (dealt with in another scenario).
This scenario - Victory points are based around the control of Gémioncourt and Quatre Bras, plus of course damage inflicted to the other army.
There is another scenario in the package that plays both the Quatre Bras and Ligny scenarios at the same time and in that scenario, the lateral road that connects the two battlefields also yields victory points.
The photo here shows the initial set-up. Off picture, further down the map (at Gosselies) sits d’ Erlon’s 1st Corp, which famously marched and counter-marched between both battlefields, arriving at neither, but his arrival at either would likely have been decisive ….. will he turn up today!
In our scenario, there is a chance that he will arrive to support Ney (position 1 on the map) …. but also a chance that he will march off towards Ligny! (Position 2)
The turns are hourly. The eight turn scenario starts at 2 PM and ends at 9 PM, which is a night turn. Map scale is 525 yards (50 acres) to the hex. The weather starts as ‘Heat’.
AAR - The French early advance is successful and they take Gémioncourt, only to be immediately pushed back out by Kempt at 4 PM.
It starts to rain, which reduces visibility, preventing the artillery from using ranged fire (bombardment).
Kempt’s advance into Gémioncourt was unsupported and he is soon ousted, leaving Quatre Bras exposed and which in turn is captured by Soye.
At 6 PM the weather worsens and thunder storms rage, making artillery slower to manoeuvre and infantry becoming less effective in combat (halved).
Pack re-takes Quatre Bras from the French, who immediately counter-attack and push Pack back out. By this time, the Anglo-Allies had been taking the worst of the casualties and Wellington was considering calling a General Retreat, when Cooke’s Guards suddenly appeared from Bossu Woods and flung themselves at Quatre Bras, in one final glorious Hoorah, capturing it, literally on the last combat die roll of the game!
Darkness descended and the two forces disengaged. Wellington had indeed spent the day pinned in place, as the French had intended, though that last minute capture of the cross roads caused a swing of 10 Victory Points from French favour to Wellington, reducing the French Victory from a potential Strategic Victory to a ‘French Marginal’ victory.
As for d’ Erlon, he did not reach either battlefield, but for me as the Anglo-Allied player, it would have been great fun to see him activated and for the French to think he was moving up to support them, only for him to veer off to the right and advance towards Wagnelee (Ligny battlefield) …. I’m sure that would have demoralised my opponent :-) Note - I was managing the activation of d’ Erlon, so that his behaviour, based on die rolls, was kept secret from the French player, until intention was visibly obvious, giving Ney an emotional connection to the hopeful arrival of d’ Erlon that he actually had during the real battle.
Overall, a thoroughly enjoyable game, with both sides fully involved and key locations changing hands several times.
I quite like doing anniversary battles, so I will explore the individual battles in this box and then in mid June, in time for the 210th Anniversary of Waterloo, the full campaign can go onto the table, which combines the battlefields of Quatre Bras, Ligny, Wavre and Waterloo into big scenario.
Mike and myself did that with the original Napoleon’s Last Battles game, on one long hot summers day in the 80’s …… so it is certainly time for a re-visit.
********************************************
First assault on Marngo 1800
In the latest Wargames, Soldiers & Strategy magazine (issue 135), Roy Harper has penned an article called ‘General Victor’s determined stand’, that covers the three Austrian attempts at taking Marengo, in which Roy outlines how Victor’s outstanding defence around Marengo played a significant part in giving Napoleon the time he needed to prepare his later counter-attack …… the one that famously saved the day!
This is a lovely collection of three scenarios, nicely set out and each being an escalation of the previous one in terms of the size of force and each fought over the same terrain.
The first attack has just 5 - 6 units per side and is playable in a small space and this is the game that we are playing today.
The Fontanone stream is fordable to infantry, but a unit will halt for one turn in the stream and once on the other side will be marked disordered.
To win, the Austrians by the end of play must have at least one unit on the other side of the stream or at any point in the game, have captured the village of Marengo. The Austrian part of the table is covered with vineyard, which I have represented with trees.
The author says he tends to use General de Brigade rules for this scale of game, but the stats provided are for Black Powder. I used my own home grown rules.
On the face of it, this looks a fairly impossible task for the Austrian force as they do not seem strong enough to overpower the defence, however the French left flank of two battalions are fixed in place for the whole game and the Austrian axis of advance is towards the other flank - so who knows, though there is likely good reason why two more scenarios follow!
The Austrians are allowed two rounds of pre-game artillery fire and this causes the battalion at the bridge to temporarily fall back. The Austrian line advances … and then one of those quirky moments, a Random Event generates ‘Confused Orders’ and the French guns pull out of the line …. Oh No! This is the moment that with open fields of fire, they should be hurting the Austrian advance.
The first Austrian assault on the bridge is repulsed.
The Austrians enter the stream in front of Marengo, but likewise, they are thrown back by good musketry.
The 1st Battalion of IR53 are in front of the French guns, the gunners must have panicked, because despite the close range, their fire was ineffective and the return fire from the Austrian line was devastating (3 hits) and the guns pulled out …. again!
A second assault over the bridge was repelled, but this time Austrian combined losses have been so great that the battalion wavers and falls back, unfit to return to the fray. There will be no further attacks here, the Austrians must now rely on forcing the stream around Marengo.
Generally the attacks fail and the Austrians seem to be picking up a lot of disorder markers, but are having real trouble in rolling them off, resulting in them becoming increasingly disordered.
I should say at this point that after a couple of turns of too and fro, this came down to two single, connected events. One Austrian battalion having crossed the stream assaulted the village, they were narrowly repulsed and that was followed up by a French counter-attack by an infantry reserve battalion that had moved across from the bridge. It was enough to throw the Austrian battalion back across the stream and with the rest of their force retreating, they had lost the capability to press the attack further.
So a French win, but the Austrians did get their moment … it just needed some kinder dice.
Looking at scenario 2, this is played in the same space, but reinforcements arrive for both sides, which will allow for a renewed assault and new vigour.
That all worked very well. I like with the smaller scenarios how the impact of single events cary so much weight and bring a sense of increased importance as to what happens at any one location.
Here there were two moments when fire inflicted 3 hits on the enemy and that is a big deal, not fatal, but very unhinging. Also, the French artillery on a couple of occasions drew curses from the French commander.
There was an instance when the defenders at Marengo scored just one hit on an approaching Austrian battalion, but the battalion failed their capability test (like a morale test) and retreated back across the stream, effectively setting them back for two turns. Each of these things added some welcome narrative to what on the face of it looked like a fairly certain outcome.
I very much enjoyed the game, which was small enough to give one of those elusive opportunities for a mid-week outing … thank you Mr. Harper.
*****************************************
The Fighth for Bühl

A small battle on a 4' x 4' table with 28mm napoleonics and home brew rules.
A French infantry brigade is assaulting the village of Bühl with a cavarly brigade in support on the right flank.
As always, even though a small game, this was a lot of fun.
There is a short write up and some extra photos over on the Battlefields & Warriors Blog.
LINK
https://battlefieldswarriors.blogspot.com/2025/04/fight-for-buhl.html
**************************************************
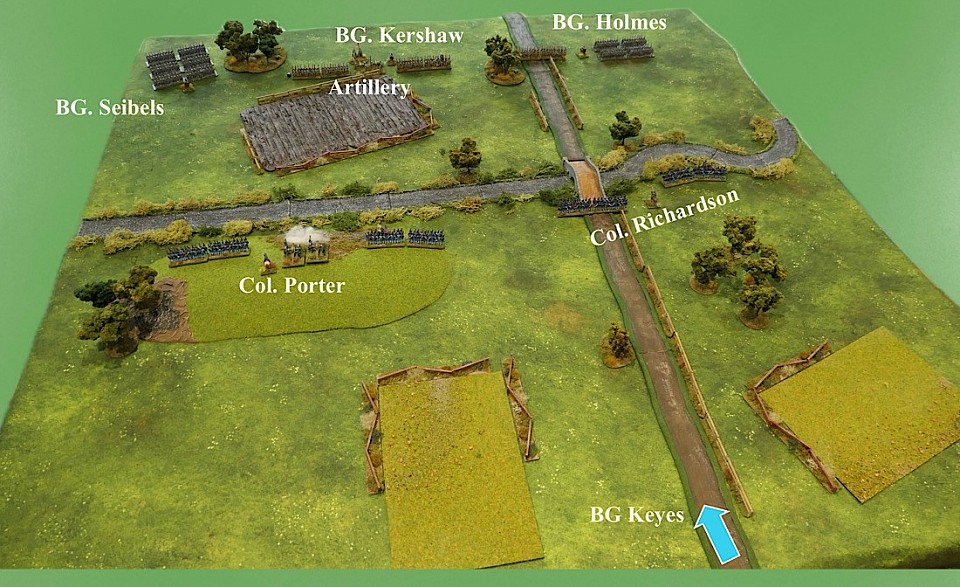
The Fight for Mill Creek
Mill Creek is a fictitious action. Two small Union brigades are holding a hill and a bridge. They have a third brigade under Keyes marching to the battlefield.
However, the Confederates with three brigades are about to attack, can they snatch a victory before Union reinforcements arrive?
The game plays in 9 turns and to win, the Confederates must have at least two regiments on the hill and control both ends of the bridge. This is a tall order, but there we are!
The game is played with my own rules and Warlord Games Epic figures.
Key Moments;
Heavy lines of grey come into the view of Porter’s men who are waiting on the hill. The crack of muskets starts to fill the air.
Confederate 6th Louisiana make their first foray over the bridge, but are repulsed by 7th Indiana.
The Confederates approach the creek and firefights break out along the line. The Union artillery is targeted by some very accurate cannon and are forced to withdraw onto the sheltered side of the hill.
6th Louisiana gather themselves together and charge across the bridge, but the attack fails with heavy casualties and the regiment withdraws becoming ‘unsteady’ and unlikely to return to the fray.
The Confederates are suffering high losses across several regiments, but the Union also have their problems and 8th Ohio, holding the Union left, on the hill, falls back ‘unsteady’. The hill is looking vulnerable.
Soon all Porter’s brigade on the hill are in full retreat, as the Confederates sweep up onto the high ground ….. but, Keyes, the Union reinforcement has arrived and those fresh troops are making an immediate counter-attack against the hill.
5th Ohio lead the assault, but suffer heavy fire to their front and the ranks are raked by enveloping artillery fire - it is too much and 5th Ohio run back through their own lines causing disorder - the game has reached turn 9 and so we assess the battlefield.
Conclusion;
The Confederates had managed to get two regiments onto the hill. If Keyes’ assault would have worked, then likely one of the regiments would have had to leave the hill, costing them that victory objective, but with the assault faltering, the Confederates claim the objective.
Over at the bridge, Holmes (Confederate) had really struggled in his fight to either cross the bridge or cross the creek nearby and so he came nowhere near his objective of capturing both ends of the bridge and so with only one out of the two objectives secured, the Confederates fail and the Union call victory.
I will shortly re-run this game using the Valour & Fortitude rules with their new ACW lists.
**********************************************
Replaying Hastings 1066
With the 1066 Stamford Bridge and Hastings games, published by Revolution Games, having gone out of print, Legion Games have become interested in doing a re-print, but they want ‘the other’ battle of 1066, Gate Fulford covering. Fellow designer Geoff Noble, who is also designing a strategic 1066 game for Legion Games, has stepped up to the plate and has created the third battle, using the same core rules.
As we get everything ready for submission to Legion Games, I am running through repeat plays of both Stamford Bridge and Hastings to make sure that everything is tight and that ambiguity is mitigated.
Today, Hastings takes its turn going onto the table.
Compared to the hack ‘n slash affair of Stamford Bridge, Hastings is much more of a slow grind, but when collapse comes, it can be quite catastrophic.
With design, I have always felt that the player should be put in the emotional hot seat of the real commanders, so Harold will typically be sticking to the good defensive position of the ridge and hoping for nightfall and to hold out ……. ‘for one just more turn’ and the player should feel that pressure.
William will be hugely frustrated by the lack of progress and likewise, as darkness looms, he will typically be sensing that ‘just one more turn’ should crack this line. But who will be the first to push the other over the edge? Can the Shieldwall hold for ‘one more turn’? Will the Normans be so battered that Harold counter-attacks and sweeps down of the hill to finish off William’s army? Or will Harold’s casualties lead to collapse of his army?
There is a little bit of scripting going on here for the Norman army, as they are encouraged to open with arrows, followed by the infantry assault and only then use their cavalry to attempt to break the stalemate. Harold’s army is encouraged to just stay on that ridge, get the defence benefit of that slope and try to keep the front rank as ordered as possible …. even when that means using the less able soldiers from the rear ranks to fill the losses along the front.
We are using the historical scenario and so starting on game turn 3 (earlier start times examine alternative openings to the battle in ‘what if’ type scenarios).
Turn 3 - The opening turn begins a sequence of occurrences that give a strong narrative and through their escalation of effect, has the Anglo-Saxon player a little concerned from the outset.
The Norman archers open the game, but get a row of extreme results. This sees four of their archer contingents leave the game for ‘going out of arrows’, while also securing two disorder results on the shieldwall.
This disorder is immediately exploited by the Norman infantry following up to contact those weak points. The Anglo-Saxon line get a one-off opportunity to throw axes, stones and sharp pointy things, down onto the assailing enemy and this seems the best time to use it. They manage to disorder one attacker.
Then a shock, with two sixes being consecutively rolled, Norman infantry destroy two housecarl units and have to comply with mandatory advance after combat. The Saxon line is penetrated and with this early Norman success - has the tone of the battle been set?
Turn 4 - A total of three housecarl units have now left the game and the lesser armed fyrd in the second line are advancing to fill the gaps. Harold is uneasy.
Turn 5 - As housecarl casualties increase (5) more fyrd are drawn into front line positions. I don’t think I can recall a game of things going so badly so quickly for Harold.
Turn 6 - Oh No! Leofwine (Saxon) has attacked the Franco-Flemish (Norman allies) on the Saxon left, pushing into their line - but this is the only part of the battlefield where Norman archers are still active and they disorder the housecarl and kill Loefwine, causing two Saxon fyrd to suddenly rout ….. Harold’s left wing is collapsing!
Turn 7 - In desperation Harold leads a counter-attack to pretty successfully re-establish control on the ridge, but at high cost! The Saxon wings are crumbling and units have started to rout.
Turn 8 - Having regained the ridge, rather than consolidating with a reinvigorated shield wall, his men come off the ridge, breaking into Norman positions. For a moment, the Normans are stunned, with a couple of their contingents routing.
Turn 9 - Both sides are now brittle and tired. The battle starts to break up into knots of contingents from both sides, hacking and slashing at each other. Again Harold enters the fray, carving his way towards William’s position. This all looks like it could go either way.
Turn 10 - The inevitable clash between William and Harold sees Harold’s bodyguard of housecarl fight to the last man and Harold escaping to the safety of nearby fyrd.
Turn 11 - Harold suddenly found himself in the most exposed part of the battlefield, the collapsed left flank, being surrounded and overwhelmed by enemy foot and mounted troops. He fought to the bitter end, but to no avail, he died with his troops.
With one of army commanders dead, that brings a ‘sudden death’ end to the game. The scene looked so chaotic and all groups had suffered enough loss that now routs brought about by casualties were becoming pretty much automatic, that I thought I would just get a general impression of what victory points the side would have scored had it not been for the loss of Harold.
On paper, it was a pretty convincing win for the Normans at 91 points to 58.
Looking back, the seeds were clearly sown for this victory on turn 1, a situation that the Saxons should have been able to recover from, but they only need to lose four housecarl units before routs might start …. If you get a bit unlucky on the dice, and they did!
Even so, there wasn’t too much room for the Normans to get over complacent as that major Saxon counter-attack brought both Norman wings close to widespread rout - the attack just wasn’t sustainable.
In this game if the big men (Harold and William) start to risk themselves in the fighting, then you know that side has problems. Overall a good outing for less than a couple of hours play.
****************************************************
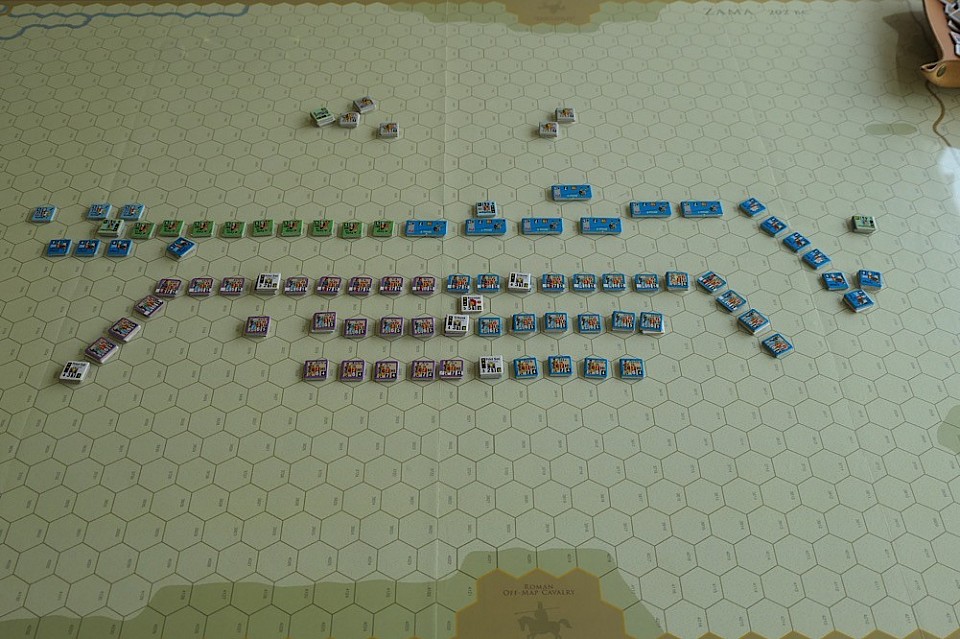
Bagradas Plains 255 BC - SPQR
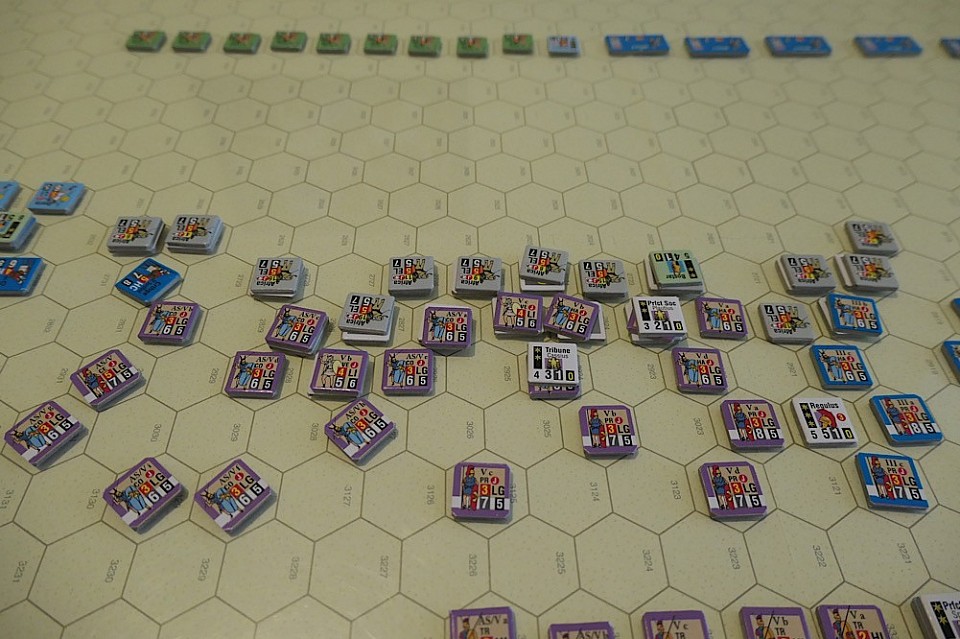
This SPQR (GMT) scenario is recommended as a ‘beginners’ scenario ….. it will certainly need some skill on the part of the Roman player to pull a win from the situation.
Xanthippus vs Roman Consul M. Atilius Regulus - North Africa, Winter 255 BC,
Background - The Romans have been fairly successful fighting the Carthaginians on land and the Roman Consul, Regulus, is pretty keen to have one big engagement that will knock Carthage out of the war.
However, the Carthaginians have secured the service of Spartan’s Xanthipuss and he re-organises the Carthaginian army to a more acceptable level of training.
The set-up immediately invites concern for any Roman player …. they are desperately short of cavalry to protect the wings. Their Alae cavalry are elsewhere, so the few remaining Roman cavalry are outnumbered 8:1.
In addition, the Roman line is initially facing 100 elephants and behind them is a wall of African infantry Phalanx. Historically, the Carthaginian cavalry swept the Roman cavalry away, exposing Roman flanks, while the elephants and phalanx frontal assault shattered the Roman legions.
In my last play, I was finding it difficult, once the lines became mixed, to determine which of the Alae cohorts belonged to the Hastati group and which belonged to the Principes.
While scrolling through posts at Consimworld, I found a most helpful entry. The poster suggested that the Principes should set up on their flip side. The flip side carries a white bar, instantly signifying which units are Hastati and which are Principes.
In the simple version of Great Battles of History, the flip side of the counter is not used in the same way as the original full rules use them. Rather they use the flip side to show which units are not in command when their formation is activated.
This of course is an equally useful administrative function, so now I just use a game marker to show which units are out of command. The single effect of being out of command is that a unit cannot enter or leave an enemy Zone of Control.
The Carthaginian cavalry superiority and the resulting threat to the Roman flanks is certainly a problem for the Romans in this scenario. My solution was to pull the Principes out towards the flanks to meet the cavalry threat, while leaving the Velites and Hastati to deal with the elephant assault.
It turned out that the Romans had done enough to protect their flanks from the cavalry threat, but their front line was ravaged by the elephants.
Phase II
Though taking heavy casualties, the Romans have withstood the initial Carthaginian assault.
The elephants break off the attack and retire. The main line of Phalanx and Celts have to open up to allow the beasts to pass through.
The Romans used this lull to re-organise their army. The battered Hastati fall back and the fresh Principes move up into the front line position. They refuse their flanks as a defence against the threat of Carthaginian cavalry. I very much like the way that this system is allowing proper tactics and army management.
In the Photograph, you can see that the Carthaginian main line has moved forward, ready to engage the Romans. In their rear are the remnants of the elephant corps (for want of a better expression!). The cavalry on the Carthaginian left are well ordered and positioned, ready to support the attack, but on their right, the cavalry wing and light infantry under Hasdrubal have become a little awkwardly placed - they need to sort themselves out!
The dark blue double hex long counters in the Carthaginian line are the North African Phalanx units, the single hex green units are the Celt warriors. The Phalanx blocks are hard hitters, getting a combat bonus for size and generally their Troop Quality factor equals or betters those of the Roman line - though they can be a little awkward to manoeuvre.
And so here we are, at what is essentially Phase II of the battle. The Romans are more than halfway to their breaking point, but I feel that the fresh Principes, now in the front line will not be an easy walkover for the Carthaginians - I am in the middle of this and the outcome is not certain, or at least the Roman side still feel like there is a fight to be had - good!
But, as the Carthaginian attack resumes, the Roman player gets an immediate sense of doom! The African Phalanx units carve into the Roman line, I am shocked at the effectiveness of the attack, though the Phalanx were repeatedly rolling good dice scores ….. but, it was not all going the way of the Carthaginians. On their right, the Celt infantry were taking significant losses and a gap opened in the centre, which the Romans took full advantage of, pouring through and enveloping the phalanx line.
It is a moment of crisis for both sides. The Romans teeter on their breaking point, can they push the Carthaginians over the edge before their own army falls apart?
The Carthaginians attack the Roman right with their cavalry, hoping to quickly bring the Romans to their knees, but their Phalanx units are starting to lose cohesion. The first unit is lost. Loss of these two hex Phalanx counters give double break points, each adding 14 points to the Carthaginian break score.
A second Phalanx is marked with 6 hits, 7 will destroy it, which would take the Carthaginians within 2 break points of losing the game, but the Romans just don’t have the time left to make this happen. It is tight, but they lose two more of their own units, pushing them beyond their own break point (125).
It is all over. Carthage wins, but it is so close.
If just looking at the map, it would be hard to pick a winner, but the break points tell their own tale. The high losses that the Romans suffered on their initial engagement with the elephants, made a comeback difficult, but there was enough hope to make the struggle worthwhile.
The Triarii (final Roman line of defence) have restrictions as to when they can be released and as it happens, those conditions were met in the last turn, so who knows what might of happened if these fresh troops had had a couple of turns to try and turn the tide.
There were three key moments in the game. (1) The initial elephant charge caused carnage in the Roman front rank, though the ‘nellies’ themselves suffered heavy losses (2) the Celts dissolved with surprising speed, leaving a large gap in the Carthaginian centre (3) the final tussle between the Phalanx units and the Roman Principes JUST tipped in favour of the Carthaginians ….. but on another day - who knows!
I must say, this was a brilliant game, the best that I have played in a while, it really drew me in. It went over the four hour mark for play and you definitely need a pair of tweezers to manage the loss markers that all of the units start to carry around in this tightly packed battlefield.
******************************************