Krosnogord Campaign 1944
Introduction to Krosnogord
This is a home brew fictitious campaign. I came across a campaign system in a figures wargame book and saw a similar situation on one of my boardgame maps that involved a valley, intersected by a river. Taking the two things together as a base for campaign and then using a tactical boardgame system to game out the campaign provides a marvellous opportunity to get some bigger theme gaming done through a series of smaller games.
The Setting
July 1944, while fighting in southern Poland, Soviet forces have come up against a mountain range, where the German positions on the high ground dominate the ground below, bringing accurate artillery fire onto anything that moves. Looking for a way to break through, 1st Brigade have been ordered to advance into a mountain pass. Their objective is to probe west and take the town of Krosnogord at the far end of the valley. To reach it, they will have to cross the River Wislok, which could be well defended. If they can push beyond Krosnogord, the break through will be complete.
Boardgame tactical system - Old School Tactical published by Flying Pig and designed by Shayne Logan.
Campaign engine - The final chapter in Charles Grant’s book ‘Programmed Wargame Scenarios’ (2nd Edition) has a generic campaign called Reconnaissance in Strength and essentially works as a ‘ladder’ campaign.
Campaign setting - inspired from a boardgame map in the East Front Battles series from Decision Games.
It is actually a reconnaissance in strength type scenario that deals with an advance along a mountain pass / valley by the Blue Force (Soviets for us), which will fight over eight game tables, before reaching the final table - the town. We shall replace the individual figure battle tables with the small maps that come with the boardgame’s various support modules.
Red Force (Germans for us) is defending the main town at the end of the pass, but they also have detachments further forwards in the valley, with the intent of delaying and disrupting Blue Force.
I will run this campaign with a series of short After Action Reports, so that the reader can follow the progress from map to map. It will probably be played over several weeks or months, but all will be reported here in chronological order from the perspective of the Soviet side.
The order that the paper maps will appear in the chain of advance will be chosen randomly. The final map is fixed and will be map number 1 from the ‘Phantom Division’ module, as this has concrete type building structures that will represent our destination town - Krosnogord.
The order-of-battle here reflects ownership of mainly 1st Edition OST Vol I upgraded to 2nd edition (east front) and the Red Blitz module, hence there is something of a hodge podge collection of unit types in the Soviet Infantry battalion, with companies of standard rifle sections, Irregulars and Guards, which is an unrealistic mix at this formation level, however, the game’s counter mix is what it is and those variables should give the Soviet player some interesting choices as to which troop types should be used at any one time and place. Just think of them as green or veteran etc.
Here are your available forces ……….. Captain Voronin
Soviet Order-of-Battle
Commander of 1st Brigade - Captain Voronin (You the player)
1st Infantry Battalion
Captain Sokolov
1st Company
Lt. Grenko
9 Rifle sections, 1 sergeant, 2 LMG, 1 Molotov, 1 ATR
2nd Company
Lt. Balakin
1 x Commissar
9 Guards Rifle sections, 1 sergeant, 2 LMG, 1 Molotov, 1 ATR
3rd Company
Lt. Aliyev
9 Irregular rifle sections, 1 sergeant, 2 LMG, 1 Molotov, 1 ATR
Heavy Weapons Company, 2 HMG, 2 x 57mm A/T guns with 2 trucks to tow
1st Tank Battalion (understrength)
Lt. Ivashin
1st Company - 10 x T34 / 76
2nd Company - 4 x T34 / 85
3rd Company (attached) - 5 x JSII
1st SMG Company (attached) 7 Shock sections, 1 Lt. Chekov, 1 sergeant, 3 satchel charges,
Reconnaissance Company 1 x Lt (spare), 2 BA-10 armoured cars, 3 trucks, 3 x 1st line rifle sections, 3 x sapper sections, 2 LMG 1 Sgt 1 flamethrower (sapper only)
Artillery support is randomly determined at the start of each battle.
All Gut Check ratings are 7 with the following exceptions.
Guards and Pioneers (includes Sappers) are 6, while Irregulars are 8.
Impulse Points - For each battle, the Soviet army gets a basic 4D6. After the first battle, this is always modified. At the conclusion of each battle, check how many casualty points the force lost during that battle. If it has been 12 or more then in future battles the Impulse allowance is permanently reduced by 2 points. These are cumulative modifiers, so if the Soviets have taken 12 or more casualties in two battles, their Impulse allowance for the fifth battle would be permanently lowered to 3D6 +2. Note in the final battle, regardless of any loss, Soviet Impulse Points are always returned to the full 4D6.
Recon hits trouble!
Morning - 1st July 1944.
Captain Voronin opens his attack by probing in strength along the poor quality road that runs from the valley entrance, all the way along to Krosnogord and beyond. Elements of his Reconnaissance Platoon lead the way, advancing 500 metres ahead of their support, a platoon of (3x) T34/76 loaded up with tank riders (3x) Rifle Sections, who in turn are 500 metres ahead of the the main elements of the brigade.
Resistance is expected to be light until the approach to the River Wislok ….. but, there is an early surprise for Voronin.
A couple of Panzer IV’s are lurking up ahead. Oberleutnant (1st Lieutenant) Otto Müller, platoon commander, has recently received a newly trained panzer crew commanded by Herbert Schneider. He had was trained at the Panzertruppenschule II at Wünsdorf in Germany and then later transferred to a reserve battalion for further training in gunnery and manoeuvres.
Now with a well rounded crew, Schneider has been posted to Müller’s platoon. This morning, Müller had ordered his reliable tanker, Schmidt, to take Schneider closer to the front for further exercises and ongoing integration into the platoon.
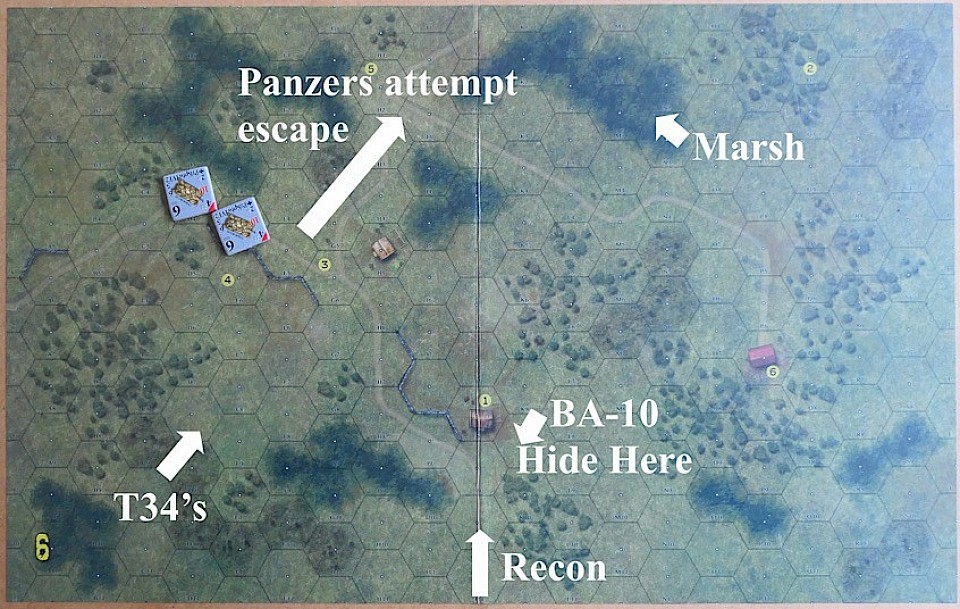
(Admin) map 6 from the Red Blitz set has been selected. This has quite difficult terrain with enough obstacles to cause widespread line of sight problems and marsh that is hazardous and creates some choke points on the the road. The action will last for 5 turns and the Soviet side will only get a Reconnaissance Victory Point if the exit the top edge of the map. The panzers themselves are surprised by the sudden arrival of the fast recon unit and are not in positions of advantage (randomly selected positions and facings). Because of this, I will have the first Pz IV that fires needing to pass a Gut Check before attempting to hit their target, unless they move before firing (i.e this is to dampen down initial opportunity fire by the surprised tankers).
As the BA-10 armoured car races up the road and turns a bend, it spots the two Panzer IV’s skirting a stone wall. The front panzer takes its Gut Test to opportunity fire and fails! So the shot is classed as taken but misses. The Soviet driver anchors on the brakes and reverses behind a building for cover.
The rifle section in the following truck hear the shots and. Immediately the men dismount and start to move out.
The panzers move towards where the road exits the map, intending to hold up the Soviets as long as possible before retreating. Their change of position reveals the armoured car to Schneider and he exchanges shots with the BA-10, knocking it out.
By now, the supporting three T34’s with their riders are arriving. The first is knocked out by Schmidt. But, enough is enough, it is time for the panzers to pull out. Schneider does so, reversing back up the road, but Schmidt has become hemmed in by the marsh.
As he pivots to allow himself to reverse out of danger, heavy fire starts coming in from the two remaining T-34’s plus artillery strikes and rockets (gained from the Soviet Luck Card).
This part of the game is played with breath held on every die roll as the rockets miss and nearly hit their own troops! The artillery causes minor damage. A T34 inflicts a shaken result as Schmidt reverses, stopping him. Schmidt then recovers from being shaken. Other shots miss and then finally a T34 on the last shot of the turn, causes a second minor damage. Having two minor damage results causes abandonment, so the Panzer IV is lost and Schmidt with it.
It appears that the student Schneider has survived his mentor.
Conclusion - The Germans lose a PzIV and the Soviets lose an armoured car and a T-34. They were able to exit the map, which gives them a reconnaissance Victory Point and allows them to establish what roughly lays ahead, so that they can make a suitable deployment for the next game. The reports are that the Germans hold the road in platoon strength and have tank support.
Because I randomly re-ordered the maps before the campaign, the next map is actually one that should have been discovered further up the valley - it looks like the Soviet advance is being put to the test early.
Future AAR’s will be shorter than this one, but I thought here that I would enjoy a bit of story telling in what was really just a skirmish.
Afternoon - 1st July 1944
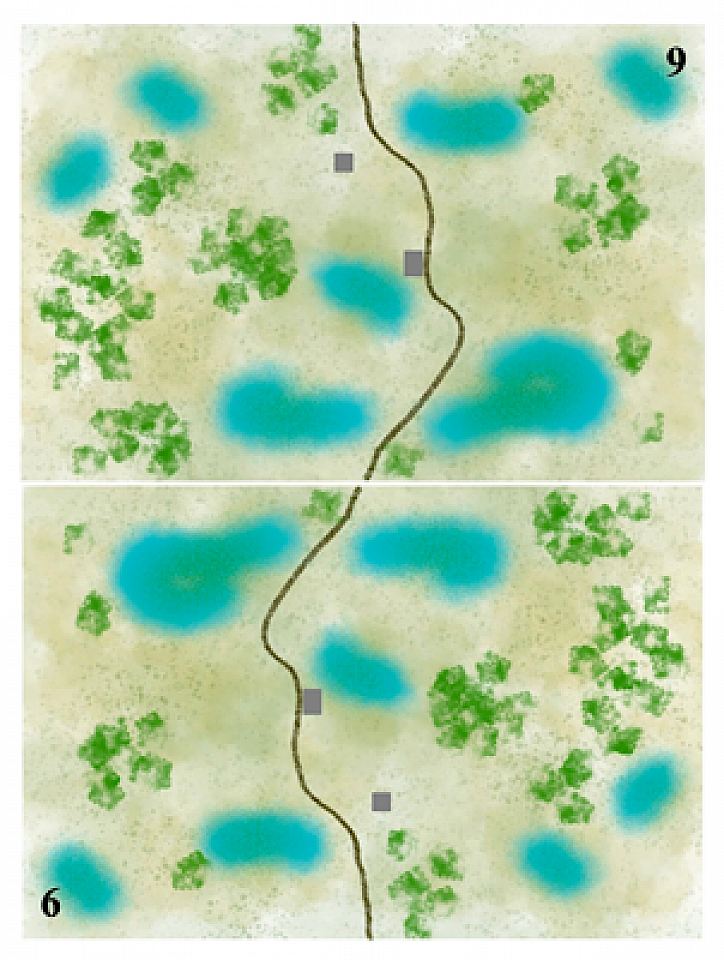
(Admin) The next game table (map) gives us map 6 again, but this time inverted, so we have all of the same problems with the marshy ground and limited lines of sight, but this time the Soviets enter the map along the edge that is more boggy and with limited avenues of approach.
Captain Sokolov orders 1st Company (9 infantry sections) to advance, grateful that Captain Voronin has allocated him five T34/76 for support.
(Admin) The German defence set up and are automatically allocated 2 cover markers. The Soviet side dice for their assault path. The result is that the main thrust is down the centre, along the road, with one infantry platoon moving up the right flank.
From the outset things get difficult for the Soviets. Their advance in the centre is squeezed onto a narrow frontage due to boggy ground to either side. The Germans take full advantage and pour artillery fire onto the narrow neck of land.
Soviet casualties are high, but they must press on.
Directing smoke from the artillery onto the German tanks and getting more T34 gun barrels into the firing line encourages the Germans to start disengaging, especially as they are at risk from the Soviet platoon on the right cutting off their path of retreat.
The Soviets are able to follow off the map, giving them another Reconnaissance Victory Point. Returning reports reveal that up ahead, the valley sides steepen, with orchards and farm buildings on the valley floor. There do not appear any defensive positions, so the order has been given for 1st Company and the remaining three T34’s to keep up the pursuit.
Casualties;
German losses - 2 rifle sections, 1 sergeant, 1 LMG and 1 Panzer IV.
Soviet losses - 3 rifle sections, 2 T34’s
Evening - 1st July 1944.
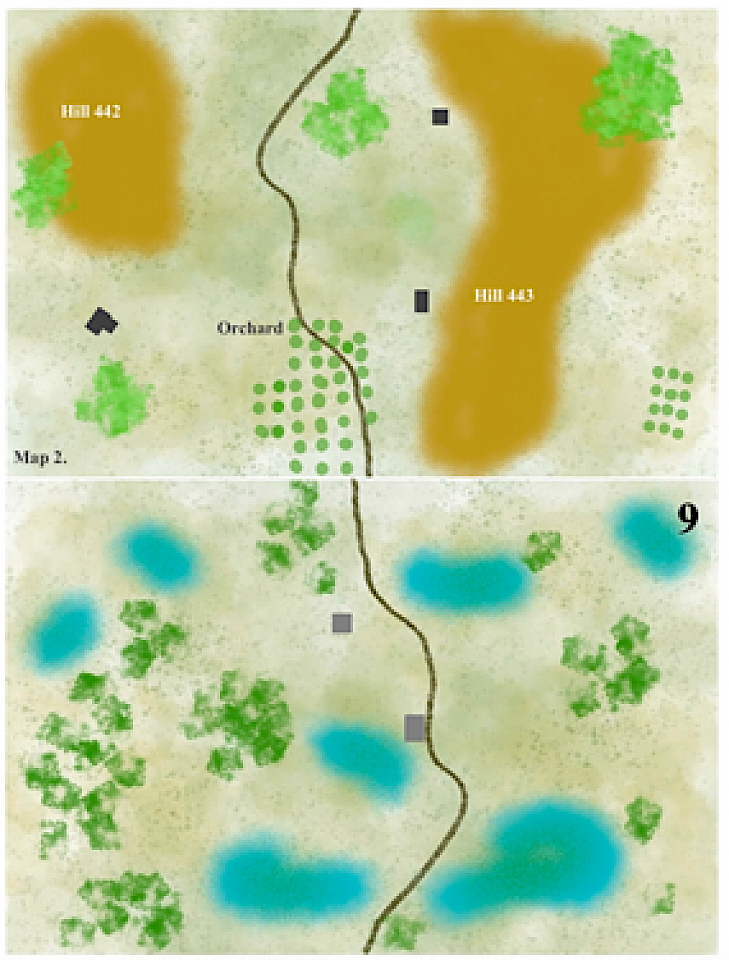
(Admin) The next game table (map) gives us map 2 from the Phantom Division module. This has some hills to either side, which we can think of here as steeper valley sides. On the ‘floor’ there are some orchards and farm buildings. We should see this as a continuing action from the afternoon fight, with the Soviets pursuing the disengaging Germans, so we have the remnant forces of the afternoon battle fighting on. The Soviets can call upon reinforcements if necessary.
The retreating German troops have no intention of offering anything more than a fighting withdrawal here. They are under orders to fall back onto the prepared River Wislok position.
The Panzer IV has taken up position on high ground - it is a good position and has the advantage that it can pull back easily to disengage and disappear from view, for an early escape. The infantry are at the foot of hill 443 in a wooden building that covers the other side of the valley. They have panzerfaust.
The T34’s move through the orchard, but trundle into mines. One T34 is damaged, the other is destroyed! Not a good start.
The third T34 makes it to the edge of the orchard, part concealed by a hedge, but the Panzer IV finds its mark and knocks out the Soviet tank - the tank platoon are in trouble.
By now the first infantry platoon had reached the hedge skirting the orchard and the second platoon was out on the right, preparing to flank the German rifle section in the building.
Observers called down very accurate artillery fire on the Panzer IV, knocking it out and the German rifle platoon had the good sense to withdraw in some haste.
Conclusion. The Soviets exit the map and claim another Reconnaissance Victory Point (the 3rd so far). Scouting reports reveal that the Wislok looks well defended with prepared positions. There is activity at the bridge and it looks like the Germans are preparing to blow it. Infantry positions identified on the upper and lower stretches of the river may suggest shallow crossing points.
Casualties;
German 1 x PZ IV
Soviet 2 x T34/76
Darkness falls and the planning starts for the attack on the river positions.
Night - 1st July into 2nd July.
Captain Voronin, meets with his company commanders to discuss the assault across the River Wislok that is planned for first light.
He is concerned that the river defences, the last significant obstacle before Krosnogord, could stop the Soviet advance dead in its tracks.
Voronin decides that the initial assault should involve the heavy armour and the most experienced infantry from the battalion. Accordingly the understrength JS II company will lead the assault, supported by the T34/85’s. He will use Balakin’s fresh 2nd Infantry Company (Guard units in our counter mix) to force the crossing and hold the ground on the other side, while the sapper sections will secure the bridge, remove demolition charges or make any necessary repairs.
Morning 2nd July - A Bloody Nose!

The Wislok River is spanned by a stone built bridge. The length of the river is generally uncrossable, however some dug in German positions suggest that the river might have some fording points.
[There are in fact three fording points, shows as F1 to F3 on the map. The Soviet attack plan is partly determined by dice - They will attack along the road in the centre and also on the right, towards Ford 3].
We don’t have a river on any of our small pocket maps, so today, we are using board 1 from the very first Pocket Module released. The lateral road that runs west to east will count as river hexes.
The Germans have a platoon of three Panther tanks around the bridge and a dug in (hidden) 88mm anti tank gun behind the Ford 3 position. Infantry cover other river parts.
The Soviet attack in the centre will see JSII’s take the lead, while over on the right T34/85’s will close on Ford 3.
[In the Old School Tactical game system, the JSII has a slow rate of fire due to their two part ammunition and the limited number of shells that could be stored, so though the gun is a heavy hitter, in terms of shots, the panthers already have an advantage of 6 shots to 3 in the opening turn].
While the Soviet forces started to enter the board, German pioneers at the bridge set their satchel charges, with the result that they caused major damage to the bridge ….. the Soviet’s would not be using the bridge today!
The JSII has a lot of potential, but they walked straight into the firing line of the three Panthers commanded by Lt. Kruger. The opening salvo from the Panthers was pretty abysmal and for a moment the JSII’s had an opportunity to deal out some significant harm, but Russian aim from the moving tanks was also out and soon Kruger’s platoon had taken out two of the three JSII’s and damaged the main gun of the third, which with tank shells still zipping around it, managed to retire to safety.
Over on the right, the 88mm brewed the first T34 with ease. Here, 1st infantry platoon did manage to attack across the ford, but they were thrown back with heavy casualties.
Now that the Panthers had seen off the JSII’s, they started to reorientate their position, ready to face the T-34’s. With the river still firmly in German hands, the bridge uncrossable and the German Panthers likely to destroy the T34/85’s, the Soviets disengaged.
Conclusion.
The Germans were happy with their holding action and with the bridge so badly damaged, they abandoned their riverside positions and withdrew further up the valley.
The Russians had received a bloody nose, but at least they had called off the attack before losses grew to a level that would effect their future Impulse Point penalties [in the campaign, they permanently lose 1 Impulse Point for every 12 Casualty Points gained in a battle].
Of note, as the Russians did not get off the enemy side of the map, they failed to win any Reconnaissance Victory Points and are not aware of what the next section of valley holds. The Germans, in preventing the penetration gained 2 needed Victory points. The Campaign VP's are now set at 3 to 2 in Russian favour.
The heavily damaged bridge is problematic for the Soviets, if left unfixed, it will cause supply problems and deny them 3 Impulse Points each and every turn for the rest of the campaign. To keep the traffic flowing, they will need to dedicate two sapper sections to fixing the bridge for the rest of the game.
Captain Sokolov authorises this. It will take two campaign turns for the sappers to bring the bridge into some sort of useful function, so for those two campaign turns, the Russian force will automatically lose two Impulse Points in every game turn.
The delay in sorting all of this out will mean that the German river force will have a chance to get away without being immediately harried and able to choose where they next fight. The fully intact Panther platoon is going to remain a worry for the Russian side.
Casualties
German Losses - The 88mm gun took casualties and is flipped to its slightly weaker side.
Soviet Losses - 2 x JSII’s, 1 x T34/85, 1 x Rifle section.
Afternoon 2nd July.
The Russians returned to the Wislok River in force, only to find it abandoned. Securing the south bank and then slowly pushing units across the fords, the brigade readied itself to continue the advance.
The sappers quickly got to work erecting a floating pontoon bridge along side the old bridge. Once done, they would set about repairing the stone bridge, making it easier to get supplies to the front line troops.
Having lost contact with the Germans, Captain Voronin ordered the Reconnaissance Company to lead the way, followed by a platoon from the SMG company [shock troops in OST], riding on T34’s (76).
Evening 2nd July
The Rearguard.
The German Wislok force has been falling back further up the valley, but to cover that movement, they have left the 88mm and a 75mm PaK 40 anti tank gun behind from the heavy weapons company, with orders to delay the enemy advance, but to retire if under threat.
The Soviet reconnaissance was spearheaded by a BA-10 armoured car and a platoon of 3 x rifle in trucks. Immediately behind them for support were a platoon of 3 x T34 (76) with sub-machine gun armed riders.
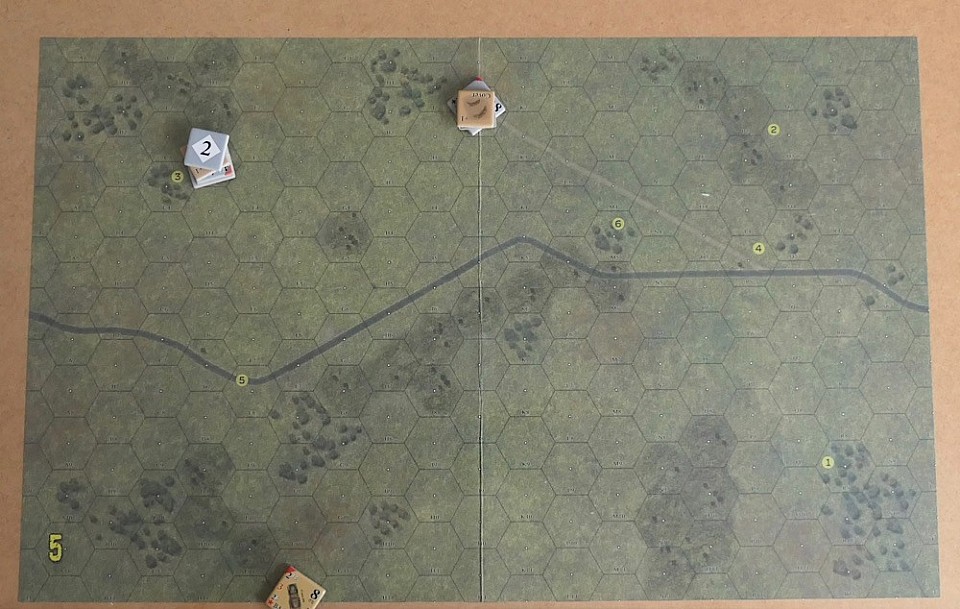
[Some dicing is done at the start to randomise ‘a plan’. You will note from the map that there is some open terrain on the right and some harder to negotiate terrain on the left. However as the Soviets did not get any reconnaissance victory points in the river fight, they blindly enter this portion of the valley and the cruel dice have them enter on the left. With the bridge still damaged, the Soviets will lose 2 Impulse Points every turn.
For their part, the German PaK 40 is allowed to set up hidden and I have shown that position with a counter marked ‘2’ as a reminder. Unfortunately, it set up with a view to get a flank shot against units entering on the other side of the map, so when it first sees the advancing Soviets, it will have to pivot to face them …. wasting a precious opportunity to get a shot off].
For such a small game, this became an exciting encounter.
The initial German shooting was really poor, so the BA-10 survived and guided the following trucks to move to the brush terrain in the centre. Here the riflemen debussed in front of the 88mm and advanced towards it.
On the left the T-34’s moved up, their riders dismounting and moving towards the Pak 40. The German guns were pretty much about to get overwhelmed. It was already time to get out of there, but first both guns, having used theit Action allowances for the turn, used ‘Intensive Fire’. I hardly ever use Intensive Fire due to the penalties, but it is an indication of the tension building nature of the scenario that it came into play.
The 88mm was destroyed by the riflemen. The PaK 40 got hooked up to its truck and pulled out. The first hex entered ... Opportunity Fire at it failed. The next hex entered (last one at the board edge …. almost there!) another Opportunity Fire ….. Boom! The truck exploded from a T34’s HE shell and the stranded gun was subsequently captured.
Casualties;
Soviet - none. Not even the mines troubled them!
Germans - the 88mm, the PaK 40 and a truck.
The Soviets get 1 Reconnaissance Victory Point (now at 4) and gain information about what is ahead. It looks like a network of walled orchards, set amongst woodland ….. ideal terrain for a German ambush!
Night - 2nd July into 3rd July.
The delay at the River Wislok had slowed the momentum of the advance. Engineers were still working on the bridge to increase capacity, but so far, only the reconnaissance, the armour and 1st Infantry Company had managed to cross.
The delay would allow the Germans to dig in up ahead and for now Captain Voronin’s brigade must continue the advance with what he has.
At first light the Soviet reconnaissance, followed by a platoon of T34’s with tank riders would continue probing to test the German defences amongst the orchards.
Kampfgruppe Weiss had indeed started to dig in. Their orders were to hold!
Morning 3rd July

[For setting the defence, the starting location of the panther tanks was diced for, as were the lines of approach for the Soviet reconnaissance company and the platoon of T34’s with tank riders].
At first light, the Soviet reconnaissance company advanced to probe the walled orchards centre and right, while a platoon of three T34/76 with SMG riders pushed up the left, intending to bypass the orchards and seize the Krosnogord road.
The Germans had been ordered to hold and Captain Lowe was on hand to ensure nothing less than a determined defence. His infantry, which included pioneers were deployed across the orchards, while the panther tank platoon that had given such an excellent account of itself at the Wislok River, was further back (top right on the map), covering the road and the open ground that surrounded the orchards. The Germans also had good artillery arrangements - the Soviets were about to enter a hornets nest!
The German recon took very heavy casualties, though they did locate the positions of the panther tank. On the left, a PanzerSchreck team took out one of the T34’s and as all of the tank riders dismounted to infiltrate the woods, they fell to the automatic weapons of the pioneers.
It was a calamity for the Soviets and the orchards were firmly still in German hands. Captain Voronin immediately released a platoon of JS II’s and a platoon of T-34/85’s in front of the panthers to deal with them. Together with the two remaining T-34/76, they were to overwhelm the panthers and secure the road.
A brutal duel began between the panthers and the Soviet armour, with both sides bringing down artillery fire and for a while, the outcome was by no means certain. However, one by one, it was the Soviet tanks that were erupting into flames.
A T-34/76 managed to get onto the panthers flank and knock one of them out, but it was too little too late, the engagement was ending as eight burning hulks littered the Soviet lines and two remaining panthers were still in position to take on anything that moved.
The past twenty four hours had been a disaster, other than having a couple of old T-34’s, 1st Brigade had lost all of its armour. The reconnaissance company was no longer functioning and the SMG company had taken heavy losses.
Worse, the Germans still held the orchards in pretty much the same strength as they had at dawn, while the Soviets did not have anything else to throw at them. What remained of the brigade was mostly still on the other side of the Wislok river, while bridge repairs concluded.
Captain Voronin had no choice but to call off the attack and retire back to the protection of the river, from where the Soviets would have to hunker down and go onto the defence until a relief force arrived.
The First Battle for Krosnogord was over!
Despatches.
The German positions were now too strongly held for the Soviet advance to resume. Captain Sokolov’s Infantry Battalion was still largely intact, but they had lost pretty much all of their supporting assets and the way ahead still needed the crossing of three maps even before reaching Krosnogord.
When the victory points are assessed for the actual fighting, both sides to date had scored 4 VP’s. So technically a draw, though as the objective of the entire operation was to breakthrough the pass, then the failure to reach Krosnogord marks this up as a clear German win.
The Soviet advance had lost its momentum back at the River Wislok. They had taken their first significant losses and the entire German defence were able to extract themselves from the area, giving them the strength to have an effective mobile rear guard, which made its stand at the orchards. Here, the panthers were able to finish the job that they started at the river, with the destruction of the Soviet armour.
The JS II is a good leveller against the German panther, but in the game, its two part shell reduces its rate of fire and the nimble panthers were able to pick them off with twice the rate of fire. In truth the dice didn’t help the Soviet cause, they typically scored very highly when trying to get a ‘To Hit’, but would then would frequently roll low for penetration, so with kinder dice, the Soviets might well have knocked out the panthers.
As it is, the panthers alone, twice saved the moment for the German side, once down at the river and then again amongst the orchards. It is their survival that has essentially secured the German win.
Did the fictional Krosnogord work as a campaign? - Yes! Of the games played, they brought a variety of interesting situations to the table. Most were quite tense, with a balance of the Germans trying to to inflict as much harm as they could, but retreating before Soviet forces could reach the road exit and pocket anything that hadn’t escaped.
Each scenario was small enough to be played in a single session and that rolling narrative that allows casualties from one game to feed into the next, added a lot to the enthusiasm of wanting to play on.
Further, I am quite certain that a bit more Soviet luck at the river could have left the German side under much more pressure than it did and that the intent for the Soviets to overwhelm the German armour at the orchard could have have gone their way.
Using dice at the start of each encounter to determine where the main assets in the defence should go and as to how the attackers should set their attack deployments, did open up play. It definitely put the hand of restraint on my sub-conscious directing the campaign to play out in a way that I thought it should go and put some emphasis of me then having to play the situation that was somewhat randomly presented.
With the apparent conclusion of Krosnogord, it leaves me with three possible options if I want to pick this back up. We could resume Soviet offensive, once some reinforcements have arrived, or play out a German counter-attack (something never envisaged at the start of this campaign), limited to perhaps just taking the river or, of course, we could do a complete restart, with forces slightly changed, the pre-programmed defence element slightly tweaked and the map order shuffled. We shall see!
Thanks to anyone who has read this far …. You get two victory points :-)
