The Klein Stetteldorf Campaign 1809
Introduction
It is 1809 and the Battle of Wagram has recently been fought between French and Austrian forces. The French won and the Austrians retreated, pursued by Masséna.
Klenau provided the rearguard of the Austrian retreat and he made a stand at Hollabrunn. The position was assaulted by Legarde, whose division was leading the pursuit. Despite a hard-fought battle, Legarde, without immediate support at hand, was forced to retire and await the arrival of the rest of his corps.
At this point we step into a 'What If' mini campaign. We might assume that Klenau took the opportunity to continue the retreat of his rearguard and had travelled less than five miles, when the French were once again snapping at his heels.
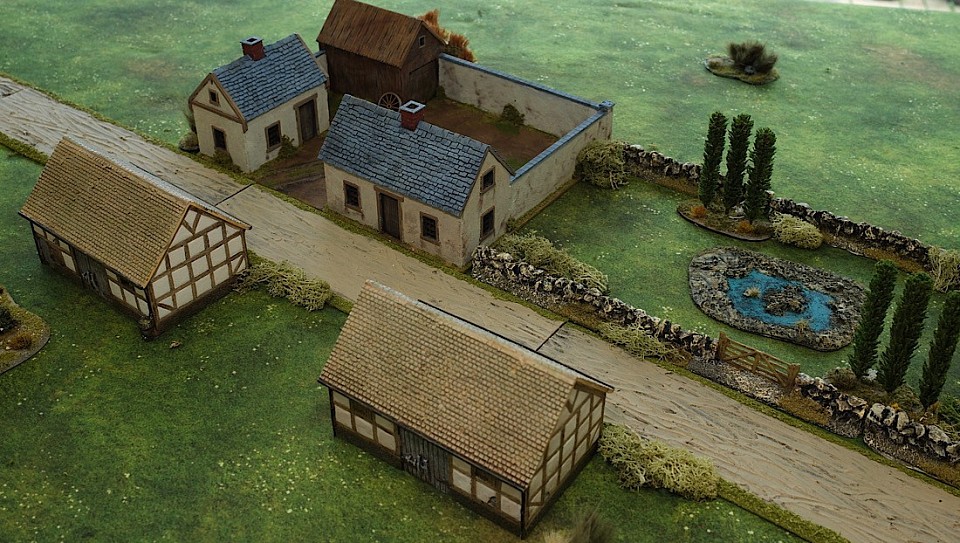
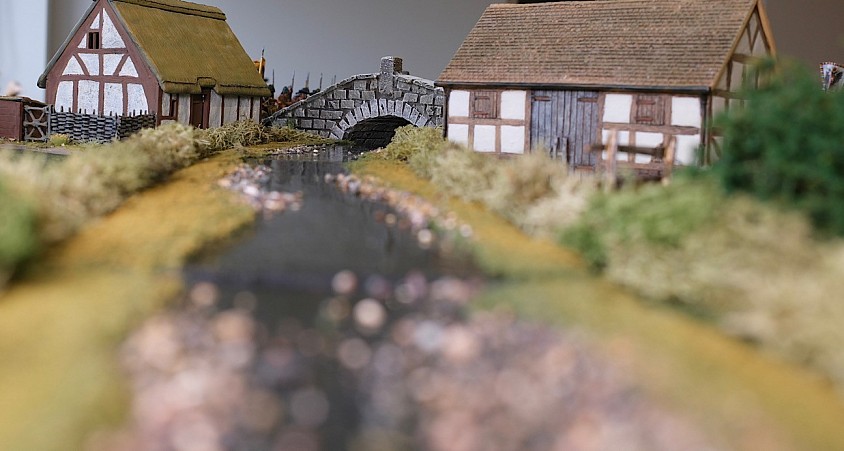
He had reached Klein Stetteldorf, a small village that sat on a crossroads with a stone bridge over the Göllersbach, a river only crossable at its bridges. Here, he would stand again and this action will form the basis of our campaign ... The Pursuit of VI Korps.
Austrian Order-of-Battle
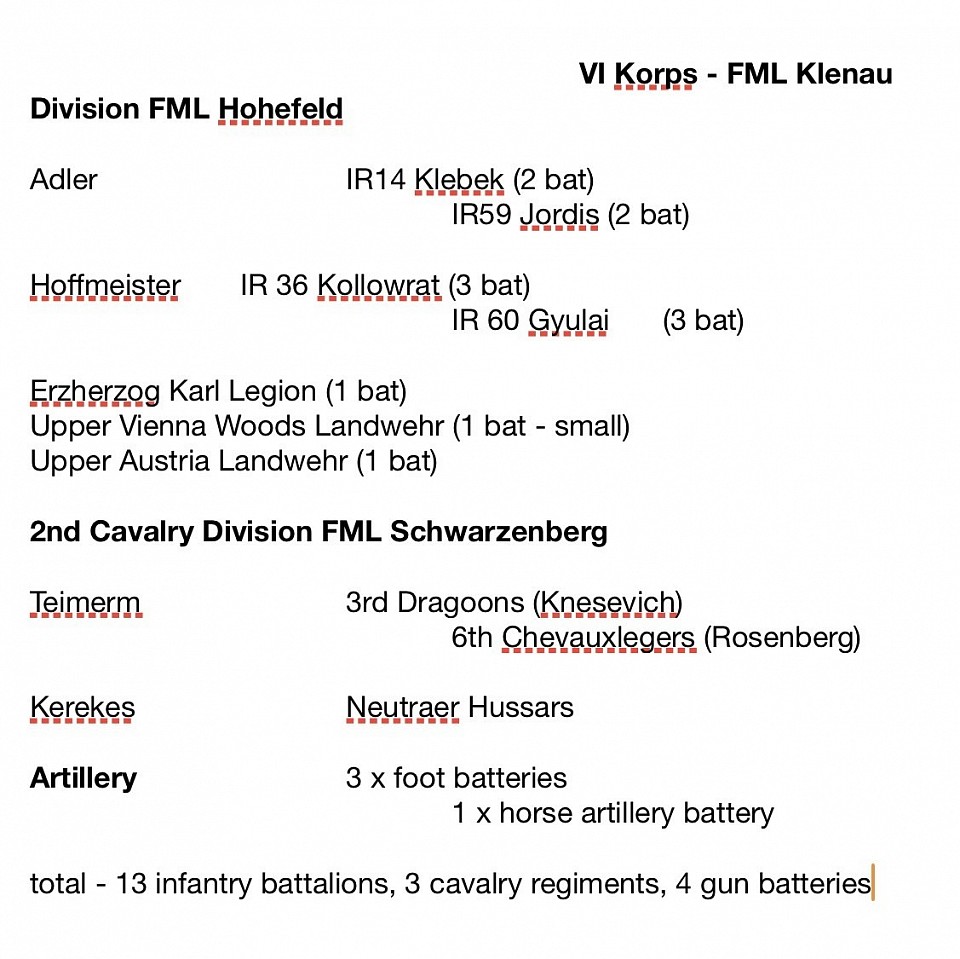
Klenau has two major formations in his command.
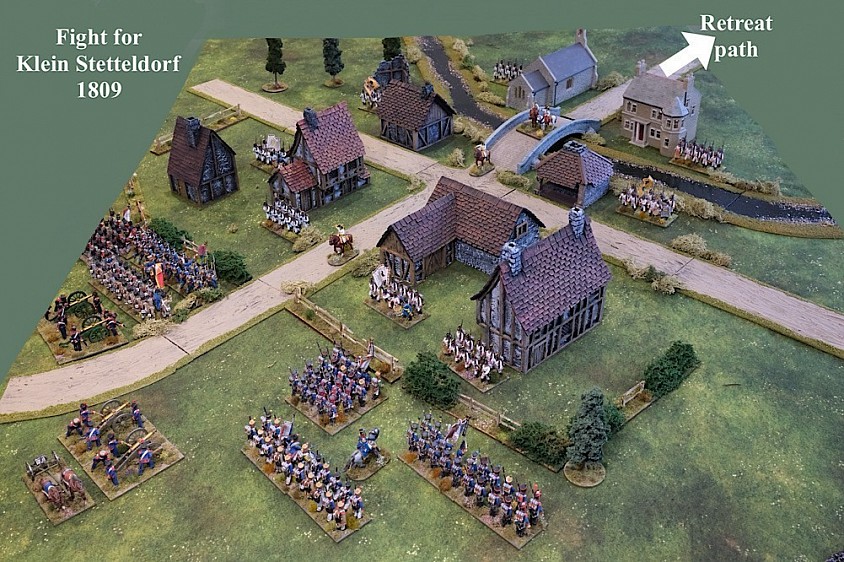
Hohenfeld has the infantry, giving four line regiments, plus three battalions of landwehr. The line regiments are dispersed to the village, the slopes in front of the village and amongst the vineyards below the village.
The landwehr cover the lower bridge and the ford above the village as an emergency backstop should the French make an early breakthrough.
Schwarzenberg has 2nd Cavalry Division, deployed on the slopes in front of the village, with hussars screening forwards across the main road to Klein Stetteldorf - the French route of approach.
Klenau is the rearguard of an Austrian army retreating after its defeat at Wagram. His orders are to hold the village and deny the crossing points over the Göllersbach to the French. He must hold for as long as possible and at least give the main Austrian army a full day's march advantage over the French, who are snapping at their heels.
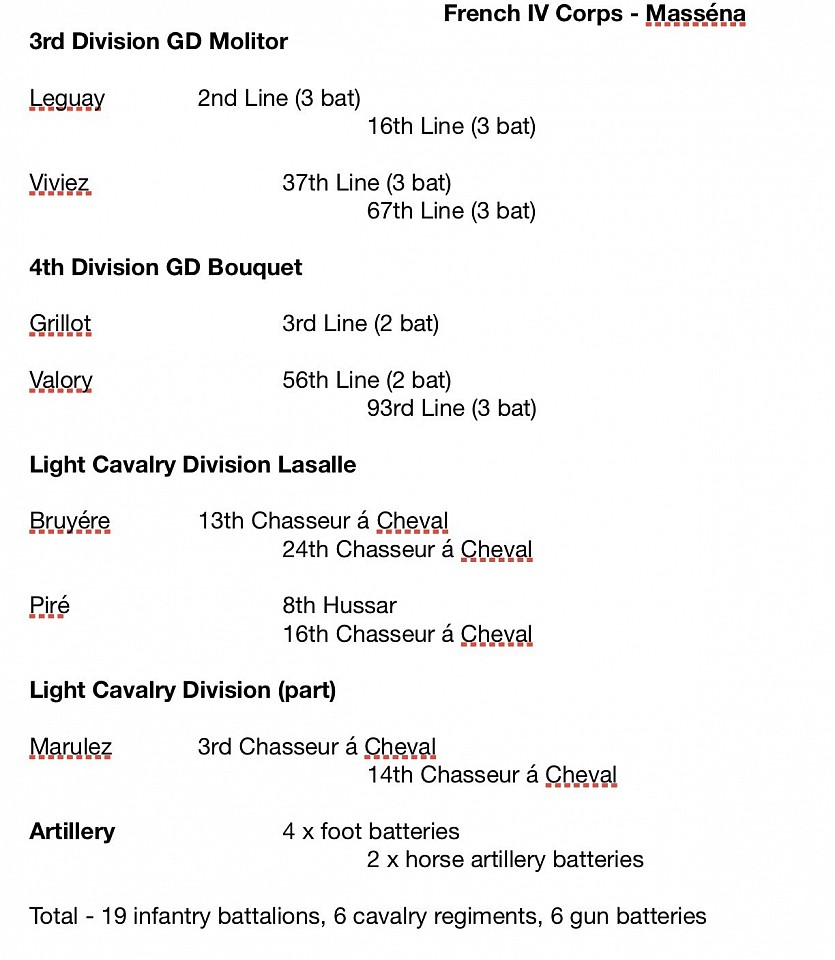
French Order-of-Battle
Masséna's IV Corps has been in pursuit of the French for several days. They caught up with them yesterday at Hollabrunn, but Legrand's 1st Division didn't have the strength to overwhelm Klenau and was repulsed. Masséna has now brought his other divisions into contact.
At his immediate disposal are two infantry divisions (3rd - Molitor and 4th - Boquet), Lasalle's Light Cavalry Division and one light cavalry brigade under Marulaz.
Masséna also has more artillery on hand than the Austrians with six batteries to the Austrian four.
His intention is to advance along the Hollabrunn to Klein Stetteldorf road and to assault the village, its lower bridge as quickly as possible, while sending another force above the village to take the ford. From these positions he hopes to isolate and destroy the Austrian rearguard before the day is out.
Campaigning
Why Klein Stettedorf? This all started with a new mini campaign booklet that Henry Hyde authored and published. His campaigning area had a built-up area sitting on a crossroads in conjunction with a river and the settlement controlling the bridge over the river.
I scoured my boardgame maps and eventually found a fairly good match to that terrain with the village of Klein Stettedorf. It was 5 miles from Hollabrumm, so it was easy to construct a 'what if' type engagement that could run off the back of the historical engagement at Hollabrumm the previous day.
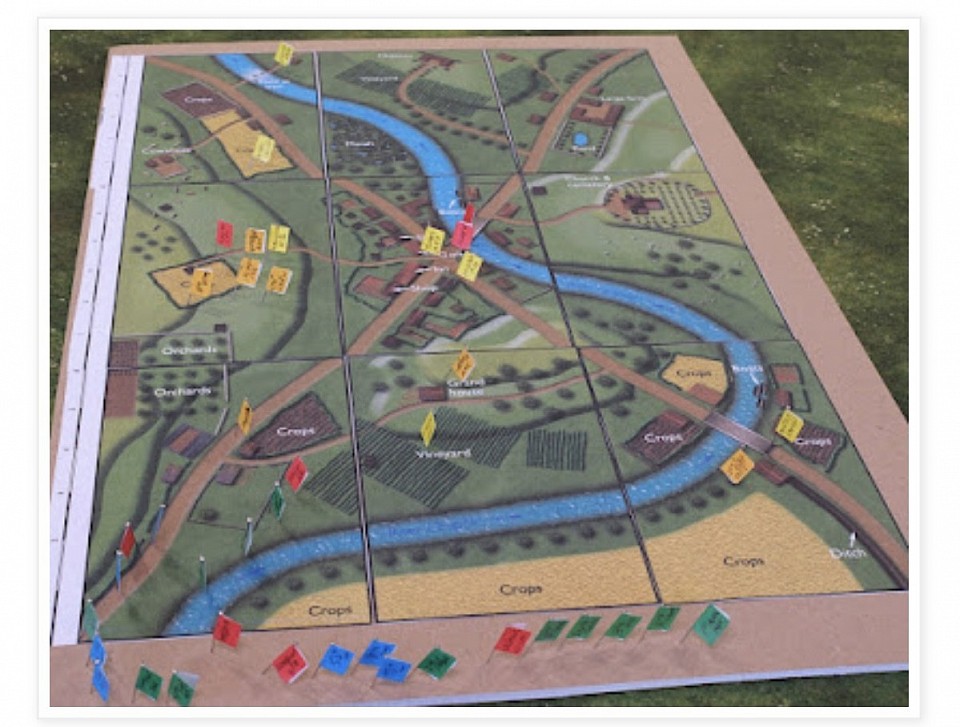
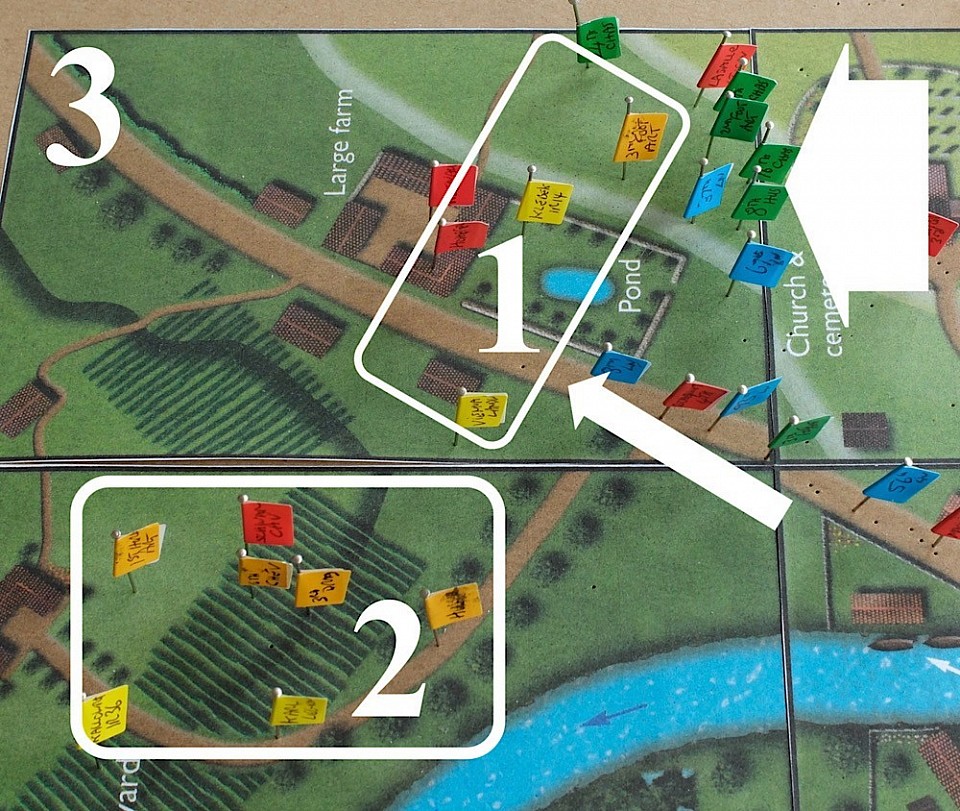
Henry's campaign area is divided into nine areas, each representing one 6x4 table. His booklet details each of these map panels. I scanned each of them and mounted them collectively onto foamboard to make a pinboard for the campaign, which is run on hourly turns.
The image here (all map imagery is the copyright of Henry Hyde) shows the opening positions. The Austrian units are deployed and the French are off map and about to enter in column along the road that enters the map in the bottom left corner.
The current strength of all formations is recorded on a roster and the orders that each unit is currently under are also recorded. New orders will have a time showing the hour that the order is received and executed.
Opening moves
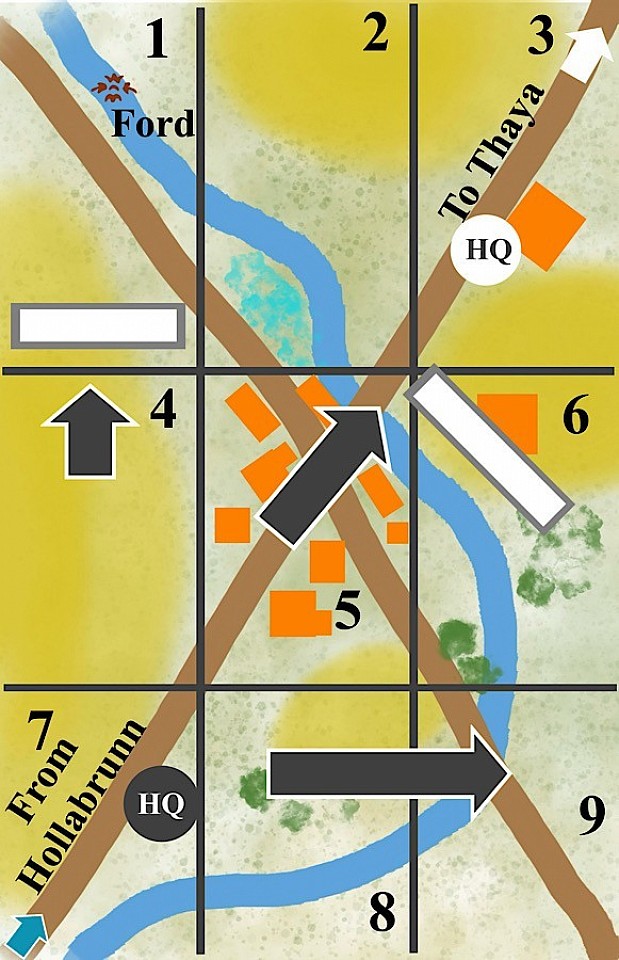
For the purposes of recording on the blog, I created a simplified map graphic which can be used to show current positions and help describe the campaign.
The campaign starts at 6 AM, visibility is limited as dawn breaks and each hourly turn, visibility will increase by two foot at table scale, until 1 PM, when it starts to gently recede until we eventually reach dusk.
On the map, you can see that the Austrians defend the village, the slopes in front of the village and the vineyards below the village.
The French have entered the map along the road. The three blue arrows indicate Masséna's intentions. Controlling the village will give him access to the large stone bridge. Above the village is a ford and behind the vineyards is the lower bridge. Crossing the Göllersbach is essential to defeating the Austrian rearguard.
As the French enter the campaign map (area 7) they meet screening Hussars, which are pushed back in towards the slopes.
Klenau knows that his task is to absorb whatever the French throw at him. He can but wait to see where the main attack falls.

Following the action
As the campaign is being fought on an hour-by-hour basis, a more thorough record of events is being recorded at the Battlefields & Warriors Blog. For those wanting that greater detail, here is the link to the first post and from there, each post is internally linked, so the reader can progress up to the current point.
LINK
https://battlefieldswarriors.blogspot.com/2026/01/junction-jeopardy-campaign-part-ii.html
I will continue below with a broad overview of events for those wishing for just the bare bones.
The Morning action
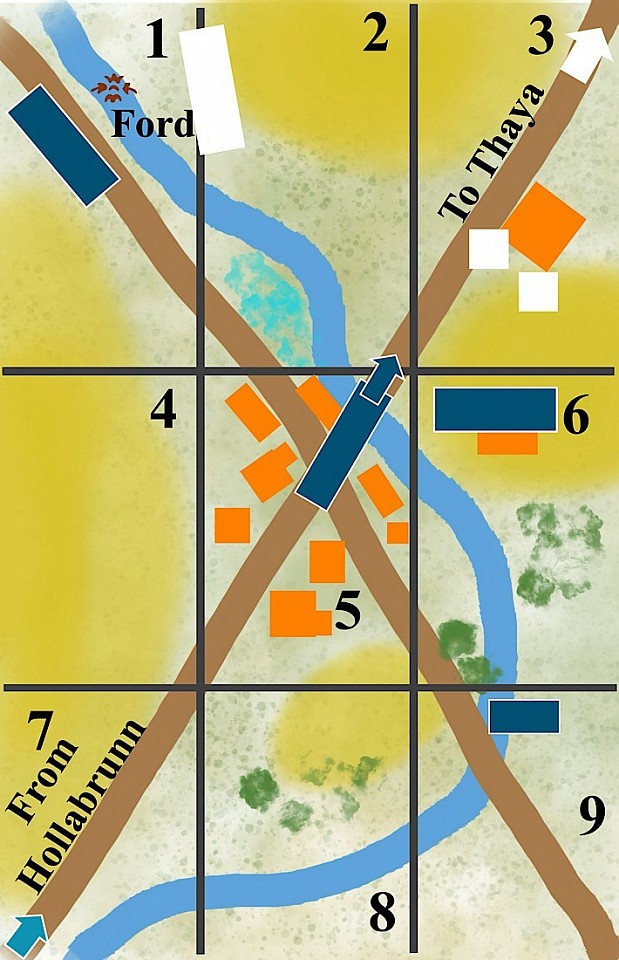
Masséna's three-axis attack was essentially intended to capture the three water crossings and to stretch the defence, though in truth it also stretched the attackers!
He had ordered his troops to aggressively attack off the march and this didn't allow time for good artillery bombardment prior to contact. The initial attacks were repulsed, reflecting the Austrian determination to stand, which seemed to surprise Masséna.
The impulsive attacks into a prepared defence saw the French picking up a lot of casualties.
The French start to make gains
A second wave of assaults was more successful, though French casualties continued to be heavy and of concern.
At the slopes in front of the village, Marulaz was able to push Schwarzenburg's 2nd Cavalry Division back, off the high ground.
In the village, Viviez, clearing first the lower half of Klein Stetteldorf, was counter-attacked and pushed and then he regained his foothold and the defence of the village collapsed, forcing IR 59 and IR 14 to flee across the bridge and rally around the church to the rear, though Viviez would lose his life in the desperate exchange.
Ledru took command of the brigade, but lacked the strength to take advantage and pursue the Austrians. Likewise, IR 59 and IR 14 were in too poor shape to counter-attack.
Down at the lower bridge it took the French all morning to capture the bridge, having to first become engaged in a costly assault amongst the vineyards below the village.
Froon's Austrian forces, which had been slowly falling back on the lower bridge, were eventually scattered, routing towards the east. This would free up Lasalle's cavalry and Molitor's 3rd Infantry Division to start moving up along the eastern bank of the Göllersbach, towards the rear of the village and the church.
By noon, the fighting had died down as pretty much everywhere, the French were needing to reorganise.
Early afternoon.
Unfortunately for the Austrians, the lull would not last for long and at 1 PM, French columns assaulted Infantry Regiments 14 and 15 at the church. Lasalle's cavalry was also moving up from the lower bridges and was able to join the assault.
Without fresh reserves the battalions of both sides were beginning to tire and lose heart. The Austrians hoped to inflict enough damage on the French that their loss of cohesion would significantly dampen their offensive capability to continue fighting this day, but by the same token, the Austrians were just, if not more, as likely to be pushed over the edge.
By 2 PM, it was obvious that the French had the better of it, but it would take another hour before they could finally secure the church and start forming up to continue their advance to Kis-Megyer Farm (area 3).
This potential stronghold was the last defendable location for Kenau's Austrians. If he failed to hold there, the remnants of his rearguard would be routed, retreating up the Theya Road and the French would be able to ruthlessly pursue.
Kenau's main problem was that the troops he needed (Schwarzenberg's 2nd Cavalry Division) to secure the farm were still too far away, having only just crossed the upper ford (area 1) to cross the Göllersbach.
On immediate hand, he had a single worn infantry battalion, plus a fresh artillery battery. It was unlikely that they could hold the French off long enough for Schwarzenberg to arrive, but everything rested on their willingness to at least try and do that!
At 3 PM
Masséna took up position on the hill at the church and saw that (1) the farm was lightly defended. (2) Schwarzenberg's Cavalry Division were approaching and would soon reinforce the farm and that (3) the road to Theya needed to be controlled if the French were to cut the Austrian retreat.
He ordered elements of 3rd & 4th Infantry Division, plus Lasalle's cavalry to attack the farm
Initially, the Austrian resistance was firm and Klenau allowed imself to believe that he could hold the French off for long enough that the Schwarzenberg reinforcement would make a timely arrival.
The French get the upper hand
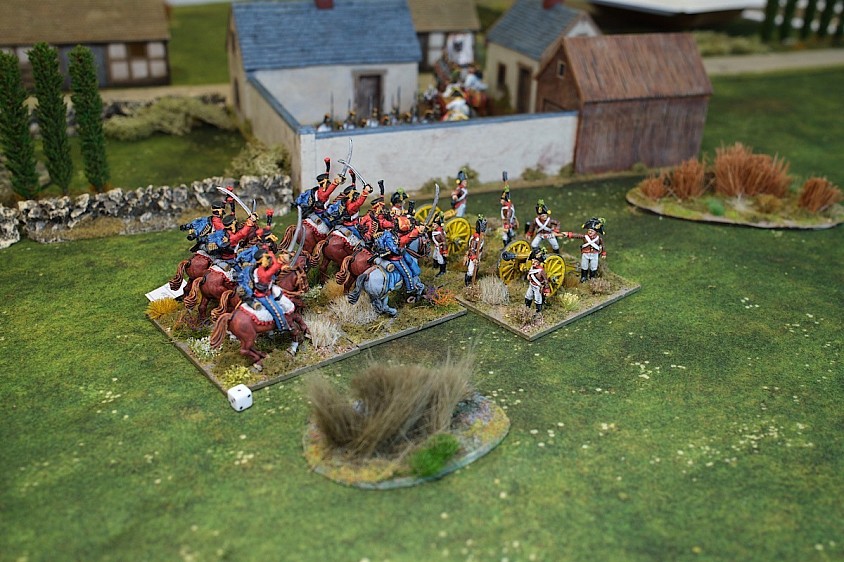
However, the 8th Hussars made what appeared to be an ill-advised charge at the Austrian guns, the guns recation fire was totally ineffective and when the charge came, the gunners were quickly overwhemed and fled.
Around the same time, an Austrian line battalion was pushed back from the walled pond, back into the farm and once there, their confidence quickly left them and they too routed. With French cavalry roaming freely around the area, the now lone fresh Austrian Landwehr unit, took the sensible desicion to quit the field and fall back towards Schwarzenburgs cavalry.
Decisions for Schwarzenberg
Schwarzenberg was convinced that he would arrive at the farm at around 4 PM, but his cavalry had pressed on, leaving his infantry lagging behind, who themselves would not arrive at the farm until 5 PM or so.
There was little point in a cavalry-only force attempting to retake the farm and if Schwarzenberg waited for his infantry to catch up, the French would be well embedded amongst the buildings and the chances of an Austrian win were slim.
The farm had been the final defensible position for the Austrian rearguard and so reluctantly Schwarzenberg started to withdraw northwards, to follow the main army, saved only by the fact that Messéna's French were too weak and worn to pursue.
There is a discussion over on the Battlefields & Warriors Blog regarding victory, losses and the performance of either side, which may interest the reader - look to the bottom half of the post.
LINK;
https://battlefieldswarriors.blogspot.com/2026/03/attacking-kis-megyer-farm-3-pm-1809.html