
Campaigning in 1471
The start of the campaign
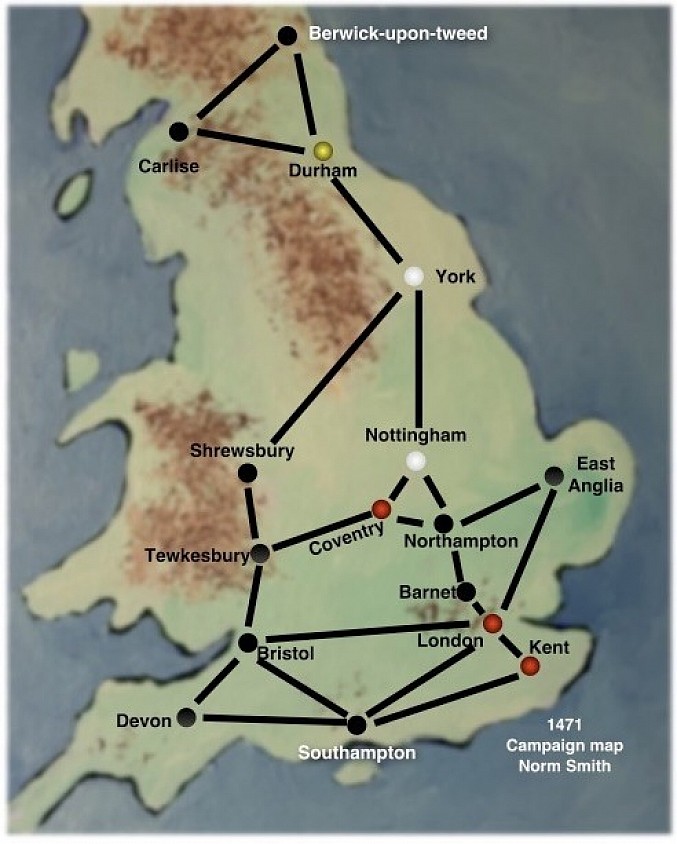
Having set down the game engine, in the last blog post at the Battlefields & Warriors Blog, for running a themed campaign for Wars of the Roses 1471, the campaign is now up and a running entry will follow here .
If wishing to look at the post that discusses the game engine, where sequence of play, forces and actions are explained, then please use this link;
https://battlefieldswarriors.blogspot.com/2026/08/practical-campaigning-1471.html
One of the key elements of the campaign is that instructions are written for the forces in each area of the map, folded and put into a draw cup and then one at a time they are drawn and acted upon, so the order that they are drawn becomes central to driving the campaign narrative and it proves to be a very solo friendly way of running a campaign.
There will be a maximum of 6 Campaign Turns. The Lancastrians (Warwick) are seeking to remove Henry VI from the throne and replace him with George, Duke of Clarence. If that objective becomes impossible, then Warwick will seek to ensure that Henry VI (Lancastrian) remains safely on the throne!
The Yorkists (Edward) are seeking to replace Henry VI with Edward. In short, the Yorkists want a Yorkist king, while the Lancastrians want a Lancastrian king ...... but one that Warwick can influence!
If the issue of kingship does not decide the campaign, then control if influential population centres will.
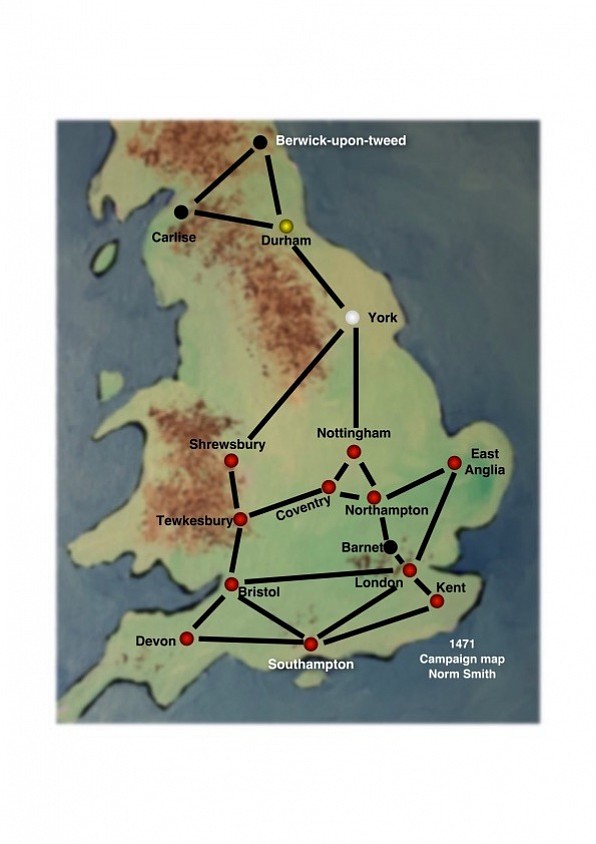
Above map - at start positions, red is Lancastrian, white is Yorkist. Yellow is independent and garrisoned (Durham). All the black dots are neutral.
1471 Campaign - Turn 1
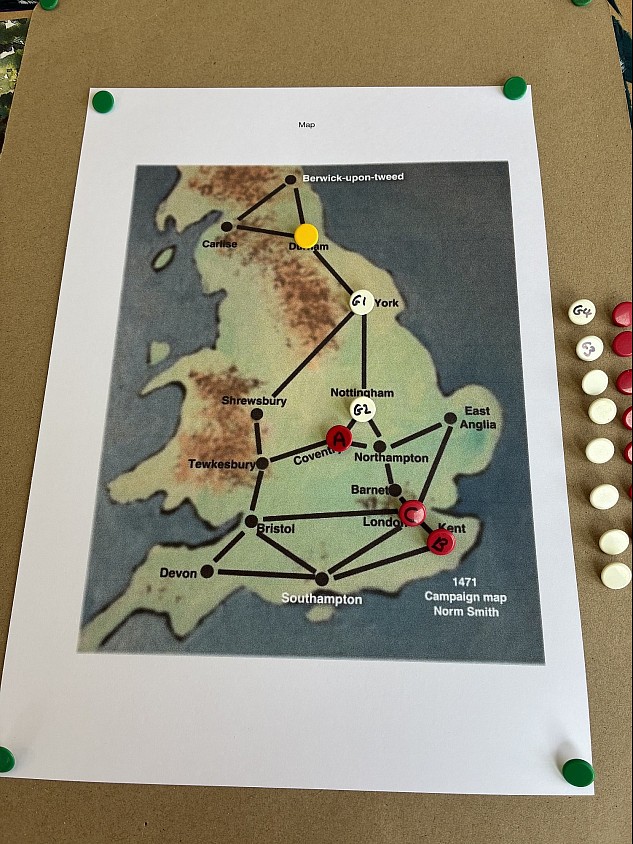
Left - Although the digital map works well, I like the handling of a real map and pins for managing the campaign.
First, we roll on the Event Table ...... Queen Margaret of Anjou can arrive at either Southampton, Devon or Kent, though the location must be either Lancastrian controlled or neutral. She brings foreign forces to support the Lancastrian cause. 1 x Pike, 1 x Melee, 1 x Handgunner.
Next, orders are written for all locations that contain a force. This, including Margaret, turns out to be 6 locations, so 6 sets of orders.
Now we go to drawing those orders. This is going to be interesting because Warwick wants to strike at Howard before the main army under Edward arrives at Nottingham.
Drawing from the cup phase
1st Order - KENT. Fauconberg marches to Southampton, where he is to meet with Margaret and combine their forces. Southampton’s allegiance changes from neutral to Lancastrian.
2nd Order - LONDON. Suddley continues to garrison the city, protecting King Henry VI.
3rd Order - YORK. Edward is here with the main Yorkist army. Hastings sends 1 x militia and 1 x artillery up north to besiege Durham. He sends 1 x melee to Shrewsbury to Garrison it. The attack at Durham fails, but Shrewsbury’s allegiance turns Yorkist and now has a Yorkist garrison force.
Edward takes the rest of the army and marches south to join Howard at Nottingham.
4th Order - COVENTRY. Warwick, with the main Lancastrian army, attacks Nottingham. Though Hastings in Edward’s army has sent some units to Durham and Shrewsbury, Howard's forces, already waiting at Nottingham, make up for that.
A significant battle results (detailed below).
5th Order - OVERSEAS. Queen Margaret of Anjou lands at Southampton with her reinforcements. Her forces combine with Lord Fauconberg. Southampton's allegiance becomes Lancastrian.
6th Order - NOTTINGHAM. Howard was to start preparing defensive positions, but Warwick’s arrival (order 4) has pre-empted him now being able to do that.
The Battle for Nottingham
(rules used are Test of Resolve)
While Warwick deployed under the typical three battle formations of vanThe Battle at Nottingham (rules used are Test of Resolve).
While Warwick deployed under the typical three battle formations of vanward, mainward and rearward (Clarence, Warwick and Oxford), Edward deployed into four battles.
Hastings, who had sent detachments to Durham and Shrewsbury took the reserve position behind Edward in the centre, while Edward's left was held by Howard, who had fewer melee troops. Gloucester was on the right.
Seeing fewer flags on Edwards left, Warwick’s plan was to advance his army quickly and hope to unhinge Howard before the Yorkist reserve could move over to support him.
Edward was content to make maximum use of his archers before any contact was made and he sought a more defensive stance.
Edward’s and Warwick’s battles in the centre were the first to clash, but Warwick quickly got the upper hand. Disastrously, during the initial fighting, Edwards Men-at-Arms turned tail and retreated, pursued by Warwick’s men, who caught them and continued to inflict heavy losses.
Along the Yorkist line, contingents started to rout, first archers running in panic, followed by the guns being overrun. There was significant pressure from the Lancastrians everywhere.
Losing his Men-at-Arms to rout was the last straw for Edward. he decided the army needed to retreat now to save itself, but disengaging was difficult and more losses followed. Edward stayed on the field until the last possible moment, to see the last of his archers and billmen escape (In consequence, in future actions, Edward will be rated as an inspirational leader).
Gloucester’s entire wing had routed (dispersed in Test of Resolve terms) and he (side note - the future King Richard III) just about escaped with his life (rolling on the post game loss table).
The remnants of the Yorkist army retreated back up the road towards York. This had been a terrible opening of the campaign for Edward, his shattered army would not withstand another head-to-head with Warwick.
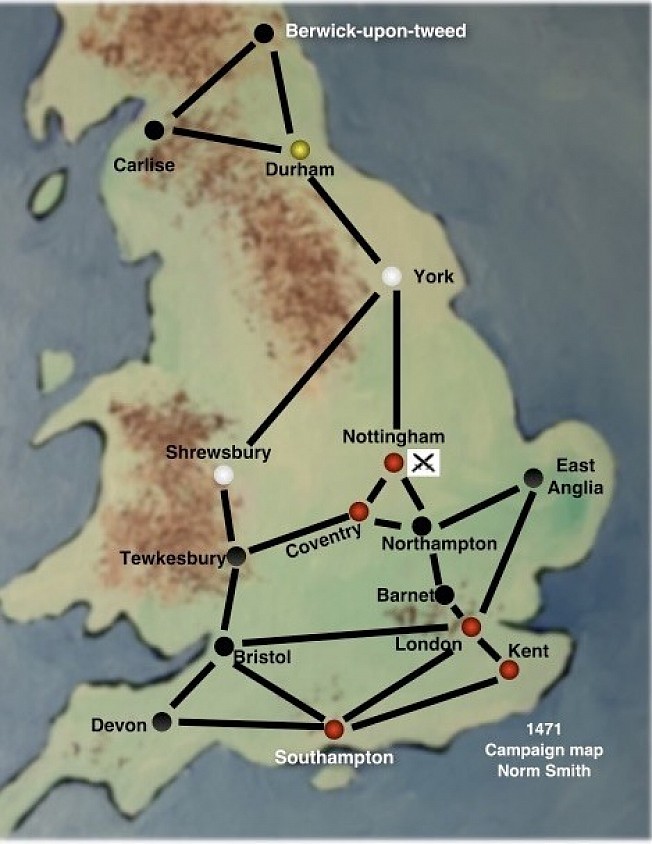
The above map shows the end of Turn 1 positions.
Edward is getting squeezed. If we add the Victory Points of allegiance at this stage, the Lancastrians are leading with 7 points to 3. Can Edward hold on?
Warwick has the initiative and what happens next will be of his making! His prime objective is to put Clarence on the Throne, so does he turn south, take London and capture Henry VI or does he drive north to deal with the much weakened Edward .... or something else altogether?
1471 Campaign - Turn 2
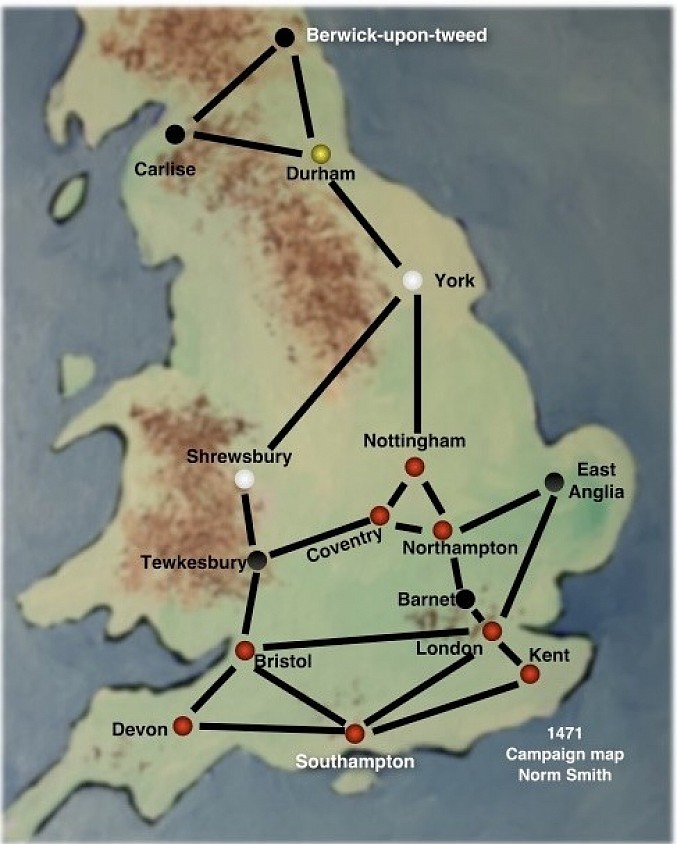
The Yorkist situation had become dire (already!). Edward’s heavy defeat at Nottingham had left his army significantly weakened. His options were few. Now at York, one obvious strategy was simply to flee the country, but for the moment at least, the nobles with him swore their continued allegiance and that was enough for him to wait and see how things might develop.
In reality their fate was bound to his. Had Edward known that Margaret was already on English soil with foreign troops, his resolve may have diminished.
Margaret’s arrival however was also a problem for Warwick. Queen Margaret of Anjou was the wife of Henry VI and a significant supporter of the Lancastrian cause, capable of leading when Henry fell into lapses of mental illness.
If the Queen had the slightest suspicion that Warwick intended to usurp royal power by replacing Henry with the amenable Clarence, she would, without doubt use all of her power and influence to destroy Warwick, even with all the possibilities of that turning into internal rebellion within Lancastrian ranks.
No! He must keep his powder dry and at least appear to be acting fully on Henry’s behalf, so marching south to capture Henry at London was for now out of the question.
Oxford favoured going north and dealing with Edward before he could recover from the recent defeat, but Warwick wanted to wait for Margaret to join him for a combined assault on York, so that their attack would be overwhelming and decisive …… and of course Margaret would be close by.
His Machiavellian mind already saw the opportunity of both defeating Edward and taking Margaret into custody at the same time, allowing him to then deal with Henry! The external consequences on the continent could be dealt with at a later date.
Nottingham served as a strategic choke point on the York to London road. Warwick would use this as a counter argument to Oxford, advocating that in staying at Nottingham for now was actually the best way of defending London, especially with the immediate threat from Edward practically non-existent!
[reader note - I am going to place 2 separate orders into the pot for Warwick, one to attack York now and one to wait for Margaret’s troops. Whichever order is drawn first will be acted upon, the other will be discarded. This reduces my influence over the campaign ….. I actually think he should attack now, but we shall see!].
Random Event Table - a 5 is rolled, a contingent of Flemish Handgunners join Edward’s army at York.While only a token force, Edward is so desperate for troops that they are heartedly greeted.
Drawing Orders, There are 6 orders in the pot, including the two orders for Warwick.
Order 1 - NOTTINGHAM, Warwick’s army stays in position, giving time for Queen Margaret to bring her reinforcements up from the south coast. He advises both Oxford and Clarence that it will serve Henry best if the Lancastrian army decisively defeat the Yorkist uprising with the help of Margaret's foreign troops. Warwick has allowed his political ambition to cloud his judgement on military matters.
He has Oxford send 1 x militia south to Northampton to ensure its Lancastrian support.
Order 2 - LONDON, Suddley continues to maintain the London Garrison, with a duty to protect Henry.
Order 3 - SOUTHAMPTON, Fauconberg sends 1 x militia to Devon. The remainder of his force combines with Queen Margaret to advance on Bristol.
Order 4 - YORK, Edward decides the army will stand and fight here. His forces begin the construction of defensive positions.
Order 5 - NOTTINGHAM, Warwicks alternative orders to attack York ….. discarded! (See order 1)
Order 6 - SHREWSBURY, the Yorkist garrison of 1 x militia, leave the city gates and return to York to join the desperate Edward. Shrewsbury’s two Bailiffs pleaded with the garrison to stay, but to no avail.
Edward’s army still had a presence, but it wasn’t one that was strong or confident enough to take on offensive manoeuvres at the moment.
Had Warwick made the right decision? On balance, we might sit on the fence, combined with Margaret, their armies would almost certainly sweep the Yorkist to one side, their defeat total, but alone, Warwick could probably, but not definitely defeat Edward, though of course this single issue was not the only one playing on Warwick’s mind.
Oxford, an aggressive commander, simply saw the decision not to immediately attack as an opportunity lost, but having voiced that, he agreed to abide with Warwick’s choice.
So no action this turn, but certainly an important setting of the scene for what might follow.
Looking at the points value for influence and control over the country, as the turn ends, the Lancastrians have 8 victory points to the Yorkist 3, Warwick’s grip is tightening.
Campaign 1471 - Turn 3
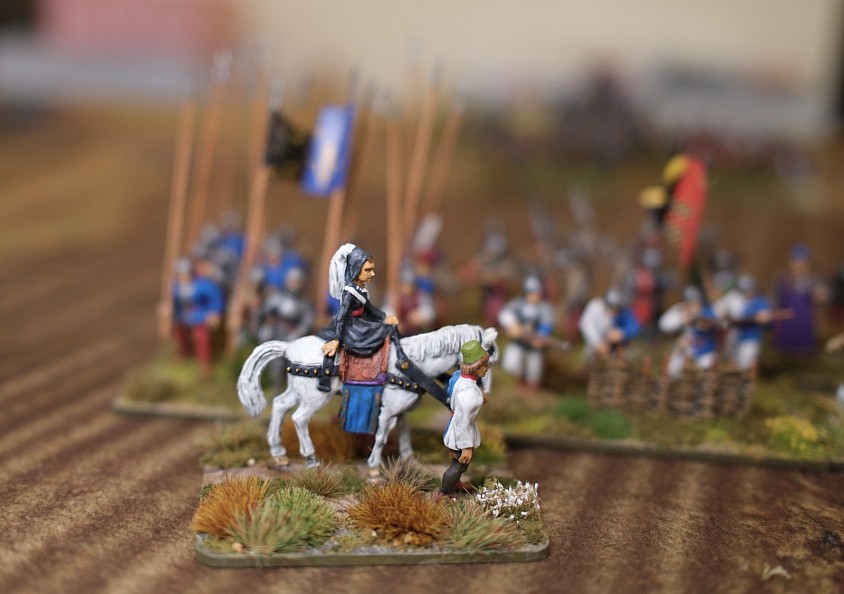
Photo left - Queen Margaret of Anjou inspects her troops.
Edward is concerned to discover that Queen Margaret has landed in the south with a force of foreign soldiers. With two Lancastrian armies now in the field, it was only a matter of time before they would unite and destroy him. He had to try and recover the initiative.
Attacking Warwick at Nottingham was out of the question, the Lancastrians were far too strong. Gloucester suggested advancing down into the south west via Shrewsbury to circumvent Warwick and strike at the foreign troops, before Lancastrian troops could amalgamate.
Edward saw favour in the plan, seeing that with Warwick blocking the road to London, it would also it would open up another avenue of approach to London from the west. What he didn’t know was that Margaret was accompanied by Fauconberg!
Campaign Event - on a 50 / 50 chance, the result selects the Lancastrians as the side to benefit from the event, which is to give one order of ‘Making Best Speed’, which allows those units to move 2 positions on the map instead of 1.
The most obvious candidate is at BRISTOL - where Margaret & Fauconberg are. This would get them past Tewkesbury and on to Shrewsbury, so that they would be positioned for a join assault with Warwick against York on the next turn - a turn earlier than otherwise possible.
Drawing Orders;
1st Order - DEVON, the Lancastrian 1 x militia there moves up to Bristol.
2nd Order - NOTTINGHAM, Warwick stands. He has been advised that Queen Margaret is 18 days march from York and expects to be able to attack in just under 3 weeks. He is just 7 days march from York. The thought of losing around 12 - 14 days of campaign time does not sit easy with him.
3rd Order - LONDON, Suddley and his 1 x militia remain at London as garrison to keep the Henry VI safe.
4th Order - BRISTOL, Queen Margaret of Anjou, together with Fauconberg’s force, move at best speed and pass through Tewkesbury to get to Shrewsbury. Her army is now just 155 miles ( 12 days march ) from York. Messengers are sent ahead to Warwick to advise of a new rendezvous date for their armies.
5th Order - YORK, Edward takes the army to Shrewsbury, leaving 1 x militia behind. He is surprised to find that the Lancastrian army under Margaret is already there. The battle lines are drawn up.
6th Order - NORTHAMPTON, 1 x militia leave and move over to East Anglia to secure their allegiance.
The Battle of Shrewsbury
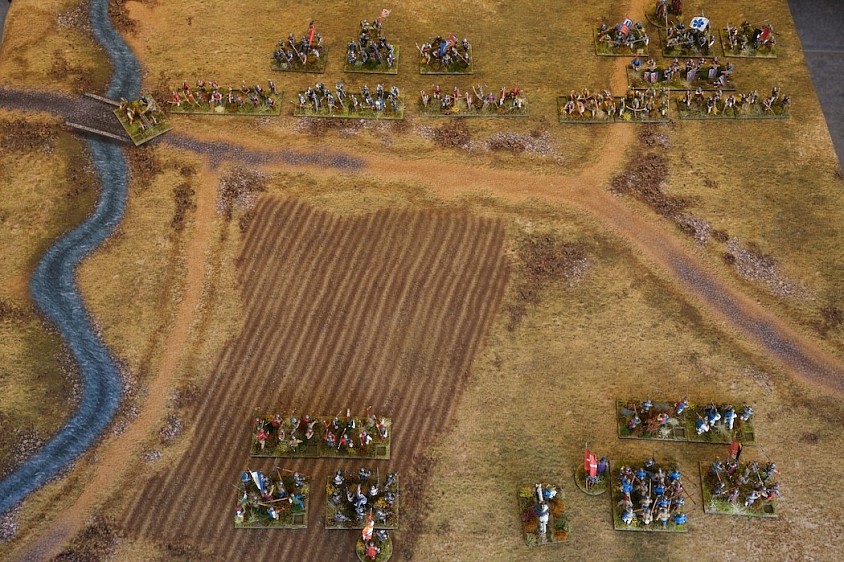
On reaching Shrewsbury, Edward was surprised to find that Margaret had already reached the town and that Fauconberg was with her. Never-the-less his army of around 12,000 still significantly outnumbered the Lancastrians by two to one.
With both armies each arrayed in two battles, Yorkist morale and confidence was high, they had caught Margaret before she could unite with Warwick and it was essential to defeat them here, now, while he had the advantage. With their front ranks packed with archers along a short frontage, it was an awesome sight.
[Readers Note - The game is now set-up and the Yorkist force looks so overwhelming, that I cannot see any reason why the Lancastrians would want to engage in this battle. Accepting that simply turning away would be difficult, I added a Lancastrian Event Card to the draw deck to essentially reflect the delay of getting a retreat order to be passed around the army for the withdrawal to be made in good order and preventing a rout, the house rule was that the Lancastrians must stay on the field until their Event Card was drawn, after which time they could choose to do whatever they wanted].
The Yorkist attack got off to a very disjointed start, for whatever reason, Edward’s battle on the left was tardy in getting going. Some of the troops may have been alarmed at the sight of the French long spears, regardless - they were slow to get going.
By total contrast, Hastings on the right wanted to throw his full weight against Fauconberg as quickly as possible, to pin them and grind them down. This aggressive commander took his men-at-arms and billmen and simply pushed their way through the archers, ploughing right into the Lancastrian position, but the Lancastrians were dogged in their defence, with Fauconberg at the front, smashing back into the Yorkist line, with his pole axe doing the work of ten men. This blood thirsty 70 year old, put the heart of every Lancastrian into the fight.
The initial assault was repulsed with heavy losses to the Yorkists. Had Hastings committed his melee troops to battle too early!
The situation went from bad to worse for Hastings as the Lancastrians pressed forward, even elements from the unengaged French wing were now moving across to support Fauconberg.
Hastings flank was turned, the casualties kept rising at an alarming rate and as Hastings fell and died while fighting off Fauconberg’s men-at-arms, the entire Yorkist right wing collapsed and routed from the battlefield.
What should Edward do, the prospect of assured victory was slipping through his hands. If he fled, it would virtually be all over for him, he would need to escape abroad, but if he stayed on the battlefield, the odds were now stacked against him.
Noting how the French flank had become exposed as they had moved over to support Fauconberg, Edward saw a last and slim chance of dealing the French a blow before they could be joined by Fauconberg, who was reorganising his force.
Leading from the front, Edward galvanised his contingents to attack. Time was of the essence.
The initial charge was hugely effective with French handgunners and a billmen running away, but still, the old enemy remained steady and Fauconberg’s contingents were already running towards the melee. In the push and shove, it was difficult to gauge who was getting the upper hand, but in a moment, it all fell apart for the Yorkists.
Edward was killed while fighting against a unit of long spears and with their cause lost, this was closely followed by the rout of the remaining Yorkist forces.
The incredible had happened! A smaller Lancastrian force that had been ready to leave the battlefield in headlong retreat, had in fact, destroyed a Yorkist army twice their size and importantly, killed Edward.
Influence
Lancastrian success on the battlefield brought greater influence with the nobles supporting Henry VI.
As the news of Shrewsbury spread, the Lancastrians support level had raised to 13 while the Yorkists, sitting at just 2 points, could never hope to achieve the popular support they needed to continue the rebellion.
Post Battle
The death of Edward brings an automatic and instant campaign victory to the Lancastrians. The Yorkist army has been destroyed in the field and the important centres of influence are now pretty much pro Lancastrian.
The north and far north would see Lancastrian mop up operations over the next couple of months. Gloucester, still at large, did not have enough popular support to continue with a challenge for the crown and he and other Yorkist nobles made their escape to the continent.
Henry’s position was secure as Queen Margaret bound Warwick ever closer to her, with further titles and land granted from the estates of Yorkist conspirators.
With his older brother dead (Edward) and the Kingmaker (Warwick) out manoeuvred by Margaret, George Duke of Clarence, reluctantly set aside his ambitions for the crown - for the time being!
Campaign Admin Conclusions.
I thought that all went really well and despite planning this to be a slow burn campaign to be played over a few weeks, it became quite compelling and was attended to daily. I can see some replayability in the campaign as even from the get go, it could run and end quite differently.
The powerful Campaign Event that sees Clarence defect to the Yorkists didn’t occur, despite every chance of that it might and that would have thrown the balance of army strength around quite a bit and there was every prospect that the opening battle at Nottingham could have been won by Edward, putting the Lancastrian position in great peril.
The total defeat of Edward’s army at Shrewsbury was nothing short of a shocker! I genuinely started the battle thinking that the Yorkists would undoubtedly win big here, knocking out this second Lancastrian army.
Using the Test of Resolve rules, I can’t remember the last time that I had such a fun, exciting and satisfying wargame. The Yorkists side had 13 units including artillery, the Lancastrians just 6 and the 28mm game was played out in a 4’ x 3½’ space, reinforcing the fact that you don’t need a lot of space or big armies to bring off a great game.
Thanks to all those who followed this throughout.